RENAL PROSECTION
Overview
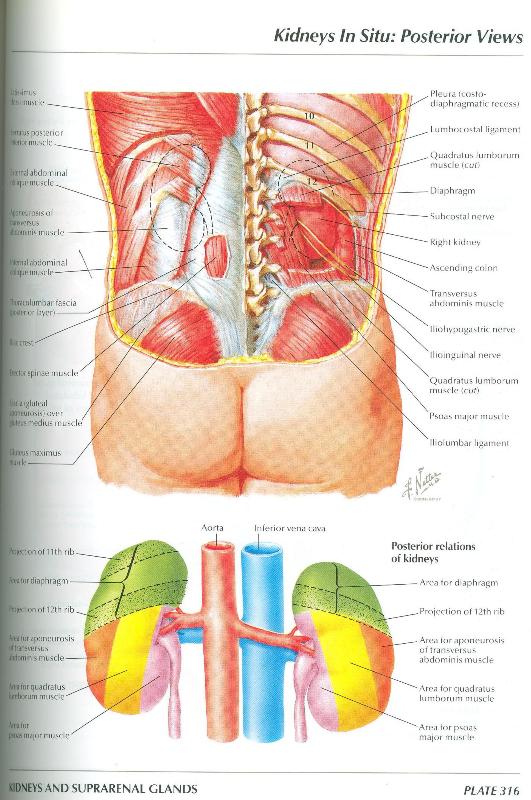
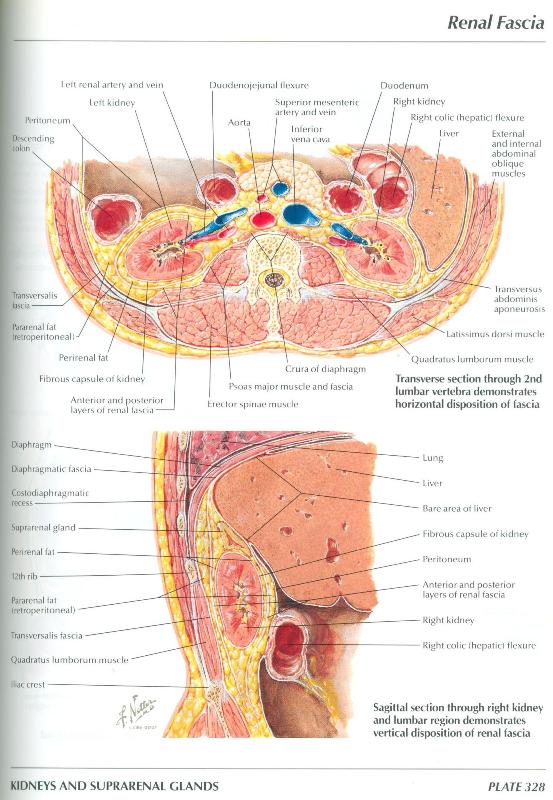
The posterior abdominal viscera are located in an area that is referred to as the retroperitoneal space. The retroperitoneal space is not a real space. It is that part of the body between the parietal peritoneum, a serous membrane that lines the walls of the compartment (peritoneal cavity) into which much of the gut evaginates, and the muscles and bones of the posterior abdominal wall. The retroperitoneal space contains the kidneys, ureters, suprarenal glands, abdominal aorta, and inferior vena cava. The kidneys are situated in the posterior abdominal wall, one on each side of the vertebral column (Figures 316 and 345). The retroperitoneal position of the kidneys is well-illustrated in a transverse section (Figures 4.43 and 328).
During this laboratory session, you will study the kidneys and their related structures in prosected specimens. You should examine three different preparations during this session: 1) a whole abdomen and pelvis prosection, 2) the bisected pelvic prosections, and 3) isolated kidneys. The order in which you study these preparations is not important. Because the whole abdomen and pelvis prosection is available in limited numbers, you should plan accordingly and take turns at these stations. While other teams are studying the whole abdomen and pelvis prosection, you should be completing the other two assignments.
Prosection of the Whole Abdomen and Pelvis: Kidneys and Renal Vessels
- On the right, observe that the kidney is embedded in considerable perirenal fat, which extends superiorly over the suprarenal glands. A condensation of fascia, called the renal fascia surrounds the kidney, its perirenal fat and the suprarenal glands. Dorsal to the renal fascia is a large quantity of pararenal fat (Figures 4.43 and 328).
- Observe that the kidneys extend between the T-12 and L-3 vertebrae but the right is slightly lower than the left because of the position of the liver (Figures 316 and 345).
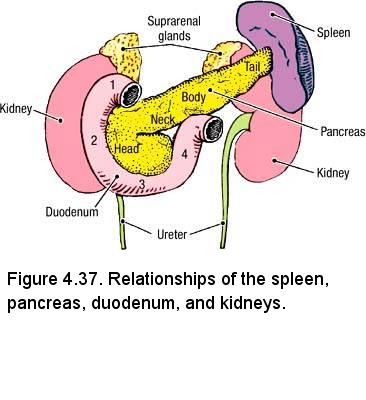
- Use Figure 316 and Figure 4.37 to review the anterior and posterior relationships of the kidneys:
- The suprarenal gland is superior to the kidney.
- The right kidney is in contact with the serosal surface of the liver, the second part of the duodenum, the right colic flexure and the jejunum.
- The left kidney is in contact with the stomach, spleen, tail of the pancreas, the left colic flexure and the jejunum.
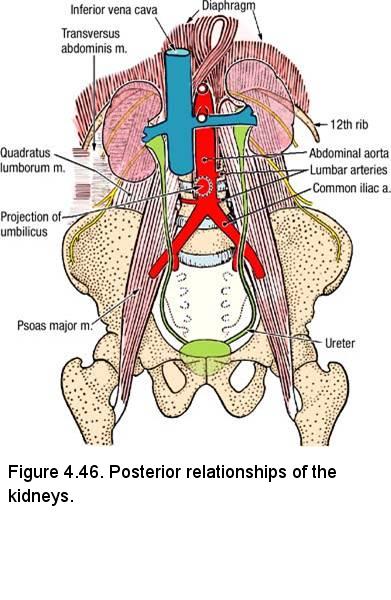
- Posteriorly, the 11th and 12th ribs, along with the subcostal (T12) and Iliohypogastric (L1) nerves. The muscles that form the posterior abdominal wall are directly behind the kidneys: the diaphragm, the psoas major, quadratus lumborum and the aponeurosis of the transversus abdominis muscles.
- Identify the relatively short right renal vein (Figure 4.46). Note that it has no tributaries.
- Reflect the inferior vena cava inferiorly and slightly toward the right. Identify the right renal artery, which lies posterior to the right renal vein and inferior vena cava. Note that the right renal artery is longer than the left renal artery. The funnel shaped upper end of the ureter called the renal pelvis lies posterior to the right renal artery.
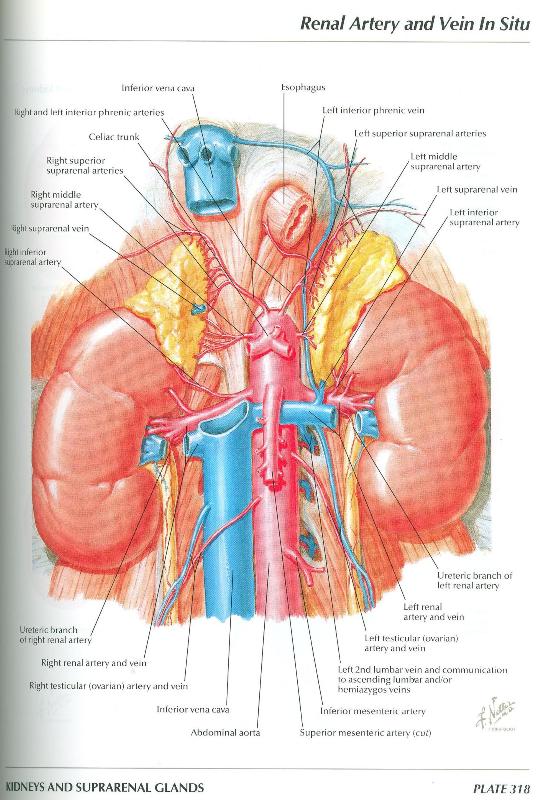
- On the left, the kidney, ureter, left suprarenal gland and the vasculature of these organs have been dissected. Observe the following
(Figures 318 and 345):
- The renal hilum is the concave medial margin of the kidney containing, from anterior to posterior, the renal vein, the renal artery and the renal pelvis.
- Variations in renal arteries and veins are common (Figure 320).
- Identify the left renal vein (Figure 4.46). Trace the left renal vein from the left kidney to the inferior vena cava. Observe that it
crosses anterior to the renal arteries and abdominal aorta. Note that the left renal vein is longer than the right renal vein.
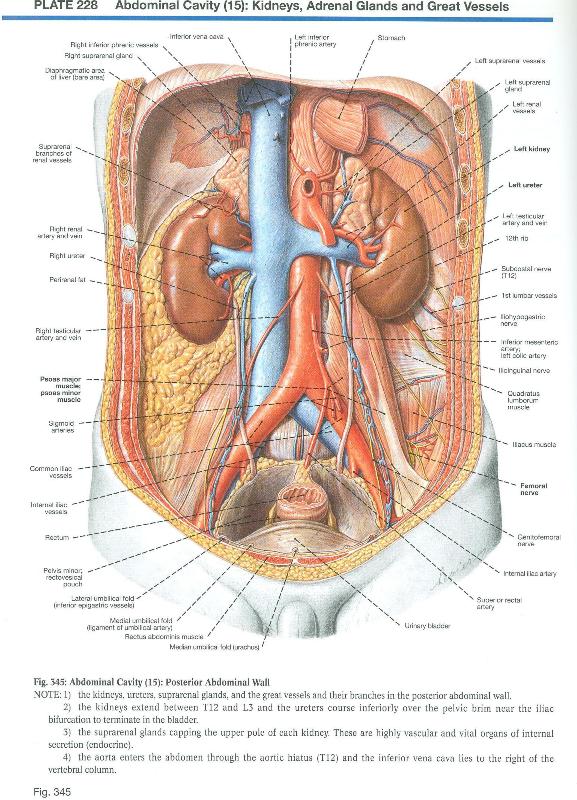
- Identify and review the course of the left testicular (ovarian) vein and note that it drains to the left renal vein (Figure 345). Observe that the right testicular (ovarian) vein drains directly to the inferior vena cava.
- Identify the left renal artery, which lies posterior to the left renal vein. Follow the left renal artery to the hilum of the kidney. The renal artery usually divides before it enters the kidney, and accessory renal arteries are common.
- Follow the ureter from the hilum of the kidney to the urinary bladder in the pelvic cavity (Figure 345). Observe that the abdominal part of the ureter passes posterior to the testicular (or ovarian) vessels and crosses the anterior surface of the psoas major muscle (Figure 345, Figure 4.46). The pelvic part of the ureter crosses the common or external iliac artery near the bifurcation of the common iliac artery. Remaining deep to the peritoneum, it descends along the lateral wall of the pelvis and curves anteromedially to the base of the urinary bladder.
- The suprarenal (adrenal) glands (Figure 318) do not embalm well and will tend to be fragile and easily torn. They are
closely related to the superior poles of the kidneys. Observe the following about the suprarenal glands and their vasculature:
- The right suprarenal gland is triangular in shape (you are not required to memorize this fact). Part of the right suprarenal gland lies posterior to the inferior vena cava.
- The left suprarenal gland is semilunar in shape (you are not required to memorize this fact).
- Since they are endocrine glands, the suprarenal gland receives multiple arteries (Figure 318)
- Superior suprarenal artery arises from the inferior phrenic artery.
- Middle suprarenal artery arises from the abdominal aorta near the celiac trunk.
- Inferior suprarenal artery arises from the renal artery.
- Note that the left suprarenal vein empties into the left renal vein. The right suprarenal vein drains directly into the inferior vena cava.
- The suprarenal glands receive numerous sympathetic nerve fibers.
- Reflect the left renal vein to the left. Take care not to damage the fragile testicular (or ovarian) vein or the left suprarenal vein where they drain to the left renal vein.
- Observe small branches of the left renal artery to the ureter and left suprarenal gland.
- Using the left renal artery as a hinge, turn the left kidney toward the right. At the most posterior part of the hilum, identify the renal pelvis and its inferior continuation, the ureter (Figure 4.46).
Prosection of the Whole Abdomen and Pelvis: Abdominal Aorta & Inferior Vena Cava
- Use an illustration to study the abdominal aorta. Observe that the abdominal aorta has three types of branches:
- Unpaired arteries to the gastrointestinal tract (celiac trunk, superior mesenteric artery, and inferior mesenteric artery)
- Paired arteries to the three paired abdominal organs (suprarenal, renal, and testicular or ovarian arteries)
- Paired arteries to the abdominal wall (inferior phrenic and lumbar arteries)
- Identify at least one lumbar artery (Figure 4.46). Four pairs of lumbar arteries supply the posterior abdominal wall. Trace one lumbar artery to its origin from the posterior aspect of the abdominal aorta. Note that the lumbar arteries pass deep to the psoas major muscle.
- Observe the bifurcation of the abdominal aorta at vertebral level L4 (Figure 4.46). In a thin person, the umbilicus projects superior to the bifurcation of the aorta.
- Identify the common iliac arteries, which arise at the bifurcation of the aorta. The common iliac arteries supply blood to the pelvis and lower limbs.
- Review the inferior vena cava and its tributaries. A segment of the inferior vena cava was removed with the liver.
IN THE CLINIC: Ureteric Arterial Supply
Arterial supply to the abdominal portion of the ureters arises most commonly from the renal arteries, and less commonly from the gonadal arteries, abdominal aorta, or the common iliac arteries. The ureteric arteries are small and delicate, and may be damaged during abdominal surgery when the ureters are retracted. Loss of the blood supply to the ureters can result in necrosis and urinary obstruction. (Source: Clinically Oriented Anatomy, 6th Ed., p. 296).
Arterial supply to the abdominal portion of the ureters arises most commonly from the renal arteries, and less commonly from the gonadal arteries, abdominal aorta, or the common iliac arteries. The ureteric arteries are small and delicate, and may be damaged during abdominal surgery when the ureters are retracted. Loss of the blood supply to the ureters can result in necrosis and urinary obstruction. (Source: Clinically Oriented Anatomy, 6th Ed., p. 296).
IN THE CLINIC: Suprarenal Glands
If the kidney fails to ascend to its normal position during development, the suprarenal gland develops in its normal position lateral to the celiac trunk.
If the kidney fails to ascend to its normal position during development, the suprarenal gland develops in its normal position lateral to the celiac trunk.
Bisected Pelvis
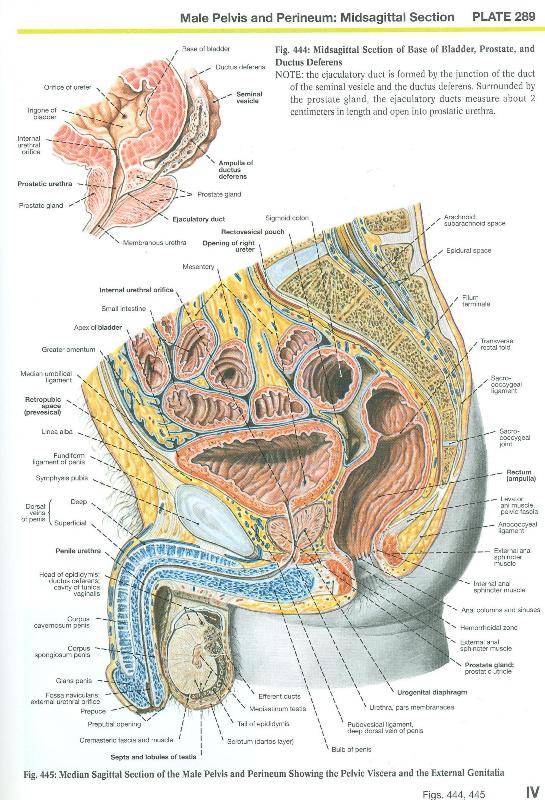
- On the male (Figure 444) and female (Figure 394) bisected pelvis and perineum; observe the following features of the urinary bladder:
- The superior surface of the urinary bladder is covered by peritoneum; the posterior surface is covered by peritoneum on its superior part and by endopelvic fascia on its inferior part and the two inferolateral surfaces are covered by endopelvic fascia.
- The thickness of the wall of the urinary bladder, its shape and its size varies with its degree of distension. The wall consists of bundles of smooth muscle called the detrusor muscle.
- The apex is directed toward the anterior abdominal wall and can be identified by the attachment of the urachus.
- The body is between the apex and the fundus.
- The fundus is also called the base of the urinary bladder
- The neck is where the urethra exits the urinary bladder. Here the wall thickens to form the internal urethral sphincter.
- The mucous membrane lining all parts of the urinary bladder is thrown into folds to accommodate expansion except for the mucous membrane over the trigone which is smooth. The angles of the trigone are the internal urethral orifice and the two orifices of the ureter.
- On the female (Figure 394) bisected pelvis and perineum, follow the short course of the urethra from the urinary bladder to open in the midline anterior to the vagina.
- On the male (Figure 444) bisected pelvis and perineum, follow the three portions of the urethra: the prostatic urethra, the membranous urethra (cannot be easily delineated) and the spongy (penile) urethra. The external urethral orifice is at the tip of the glans penis.

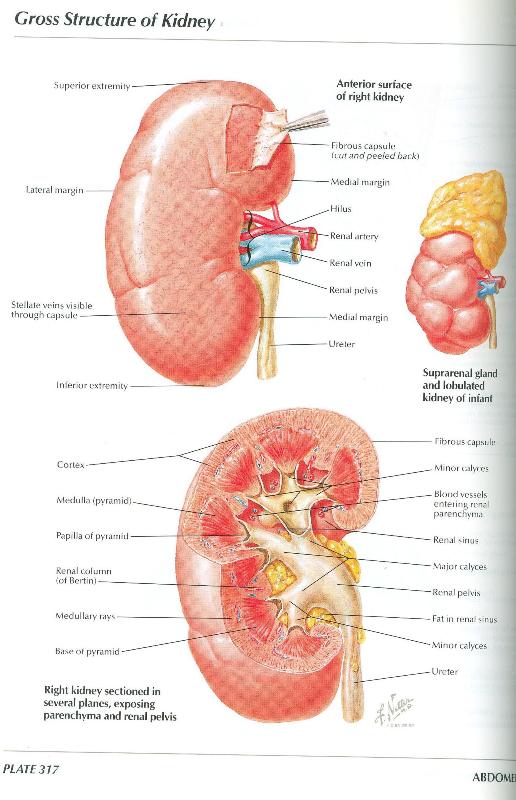
Isolated Kidneys
The kidneys have been divided into anterior and posterior halves by splitting it longitudinally along its lateral border. With the aid of Figure 317, observe the following features on various specimens:
- Renal capsule - a fibrous capsule that can be stripped off the surface of the kidney.
- Renal cortex - the outer zone of the kidney (about one-third of its depth).
- Renal medulla - the inner zone of the kidney consisting of renal pyramids and renal columns (about two-thirds of its depth).
- Renal sinus - the space within the kidney that is occupied by the renal pelvis, calices, vessels, nerves, and fat.
- Renal papilla - the apex of the renal pyramid that projects into a minor calyx.
- Minor calyx - a cup-like chamber that is the beginning of the extrarenal duct system. Several minor calyces combine to form a major calyx.
- Major calyx - two or three per kidney that combine to form the renal pelvis.
- Renal pelvis - the funnel-like end of the ureter that lies within the renal sinus.
- Ureter - the muscular duct that carries urine from the kidney to the urinary bladder.
IN THE CLINIC: Kidney Stones
Kidney stones (renal calculi) may form in the calyces and renal pelvis. Small kidney stones may spontaneously pass through the ureter into the urinary bladder. Larger kidney stones may lodge at one of three natural constrictions of the ureter: (1) where the renal pelvis joins the ureter; (2) where the ureter crosses the pelvic brim; and (3) at the entrance of the ureter into the urinary bladder.
Kidney stones (renal calculi) may form in the calyces and renal pelvis. Small kidney stones may spontaneously pass through the ureter into the urinary bladder. Larger kidney stones may lodge at one of three natural constrictions of the ureter: (1) where the renal pelvis joins the ureter; (2) where the ureter crosses the pelvic brim; and (3) at the entrance of the ureter into the urinary bladder.
Dissection Review
- Use an illustration and the dissected specimen to review the relationships of each kidney to surrounding structures.
- Trace the path taken by a drop of urine from the renal papilla to the ureter.
- Review the position, relationships, and blood supply of each suprarenal gland.
UPPER RESPIRATORY PROSECTION

Overview: The Respiratory System
The parts of the respiratory system are the air passages, the nose, the nasal cavity, the pharynx, the larynx, the trachea and the lungs consisting of the intrapulmonary bronchi with the respiratory tissue proper. The diaphragm is the principal muscle of respiration.
The Diaphragm
The diaphragm forms a dome-shaped partition separating the thoracic and abdominal cavities. The mainly convex superior surface faces the thoracic cavity while the inferior concave surface faces the abdominal cavity. The diaphragm has a right half and a left half (the hemidiaphragms). On the prosection of the cadaver:
- Identify the parts of the diaphragm from the abdominal surface (Figures 181, 362):
- The central tendon of the diaphragm is aponeurotic and shaped like a boomerang into which muscle fibers are inserted from all parts of the circumference of the inner aspect of the body wall. The central tendon is dense and fibrous and the pericardium is firmly attached to its upper surface.
- The sternal part of the diaphragm consists of two small muscular slips arising from the posterior surface of the xiphoid process, and may not always be present.
- The costal part arises from the deep surfaces of the lower six costal cartilages on each side and inserting into the central tendon. The two costal parts form the right and left domes of the diaphragm.
- The lumbar part arises by two crura from the anterolateral surfaces of the first three lumbar vertebrae on the right and the first
two lumbar vertebrae on the left and the respective intervertebral discs. Both crura embrace the aorta as it enters the abdominal
cavity at the aortic hiatus and are joined by a tendinous band, the median arcuate ligament.
- The right crus of the diaphragm is larger and longer extending from its proximal attachments to lumbar vertebrae L1 - L3 and distally to the central tendon. The esophageal hiatus is an opening in the right crus of the diaphragm at vertebral level T10. The muscle fibers of the right crus decussate and surround the esophageal hiatus.
- The left crus of the diaphragm is smaller, has proximal attachments to lumbar vertebrae L1 - L2 and pass to the
left of the esophageal hiatus.

- The arcuate ligaments (Figures 181, 362) are thickenings of fascia that serve as proximal attachments for some of
the muscle fibers of the diaphragm.
- The paired lateral arcuate ligament bridges the anterior surface of the quadratus lumborum muscle.
- The paired medial arcuate ligament bridges the anterior surface of the psoas major muscle.
- The unpaired median arcuate ligament bridges the anterior surface of the aorta at the aortic hiatus.
- Identify the three large openings (hiatus) in the diaphragm (Figures 181, 362):
- Vena caval foramen passes through the central tendon at vertebral level T8.
- Esophageal hiatus passes through the right crus of the diaphragm at vertebral level T10.
- Aortic hiatus passes behind the diaphragm at vertebral level T12.
- On the abdominal surface of the diaphragm, identify the nerve supply to the diaphragm (Figure 181): The right and left phrenic nerves. Each phrenic nerve provides motor innervation to one half of the diaphragm (one hemidiaphragm). The phrenic nerves supply most of the sensory innervation to the abdominal (parietal peritoneum) and thoracic (parietal pleura) surfaces of the diaphragm. The pleural and peritoneal coverings of the peripheral part of the diaphragm receive sensory fibers from the lower intercostal nerves (T5 to T11) and the subcostal nerve.
- Identify the arteries ramifying over the surface of each hemidiaphragm (Figure 181): The superior phrenic arteries arise from the thoracic aorta while the inferior phrenic arteries arise immediately from the abdominal aorta below the diaphragm.
IN THE CLINIC: Diaphragm
The phrenic nerves arise from cervical spinal cord segments (C3 to C5). Therefore, pain from the diaphragm is referred to the shoulder region (supraclavicular nerve territory). The diaphragm is paralyzed in cases of high cervical (above C3) spinal cord injuries, but is spared in low cervical spinal cord injuries. A paralyzed hemidiaphragm cannot contract (descend), so it will appear high in the thorax on a chest radiograph.
The phrenic nerves arise from cervical spinal cord segments (C3 to C5). Therefore, pain from the diaphragm is referred to the shoulder region (supraclavicular nerve territory). The diaphragm is paralyzed in cases of high cervical (above C3) spinal cord injuries, but is spared in low cervical spinal cord injuries. A paralyzed hemidiaphragm cannot contract (descend), so it will appear high in the thorax on a chest radiograph.
The Nose and Nasal Cavity
- Identify parts of the nose and nasal cavity:
- Naris (plural, nares) - External opening of the nose. They are separated from each other by the lower border of the nasal septum.
- Each nasal cavity begins at the naris and extends back to the choana (plural, choanae), the opening into the nasopharynx
- The nasal septum, composed of cartilage and bone and covered by mucous membrane, separates the two nasal cavities. Frequently the nasal septum is deviated to one side.
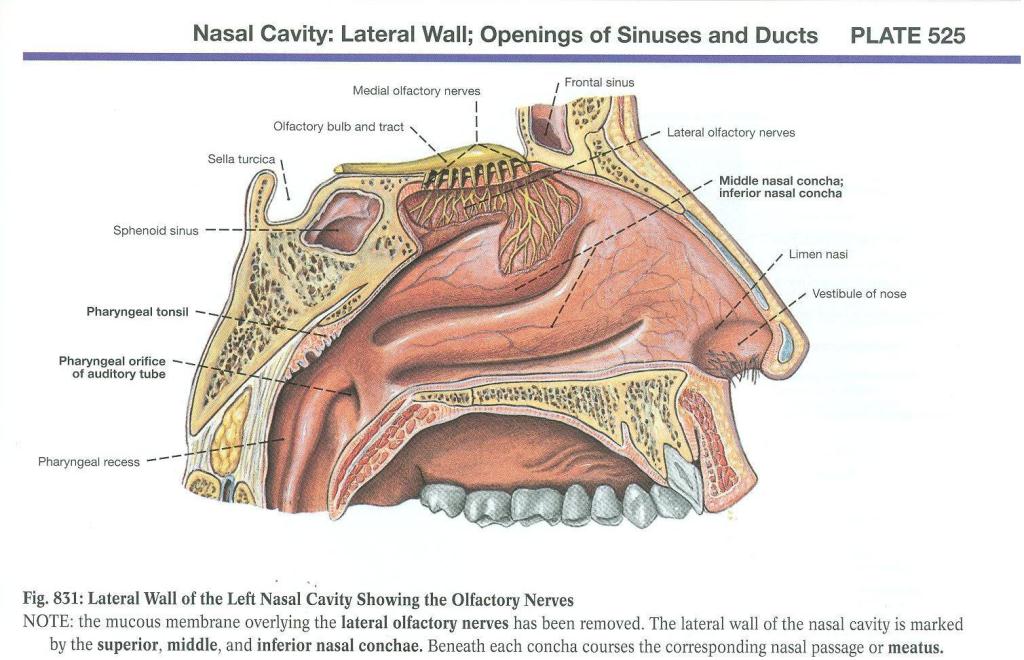
- On the lateral wall of the nasal cavity, identify the conchae (singular, concha) curved shelves of bone covered by mucous
membrane that project from the lateral nasal wall and greatly increase the respiratory surface of the nose (Figure 831)
- Inferior concha - the longest
- Middle concha
- Superior concha - the shortest
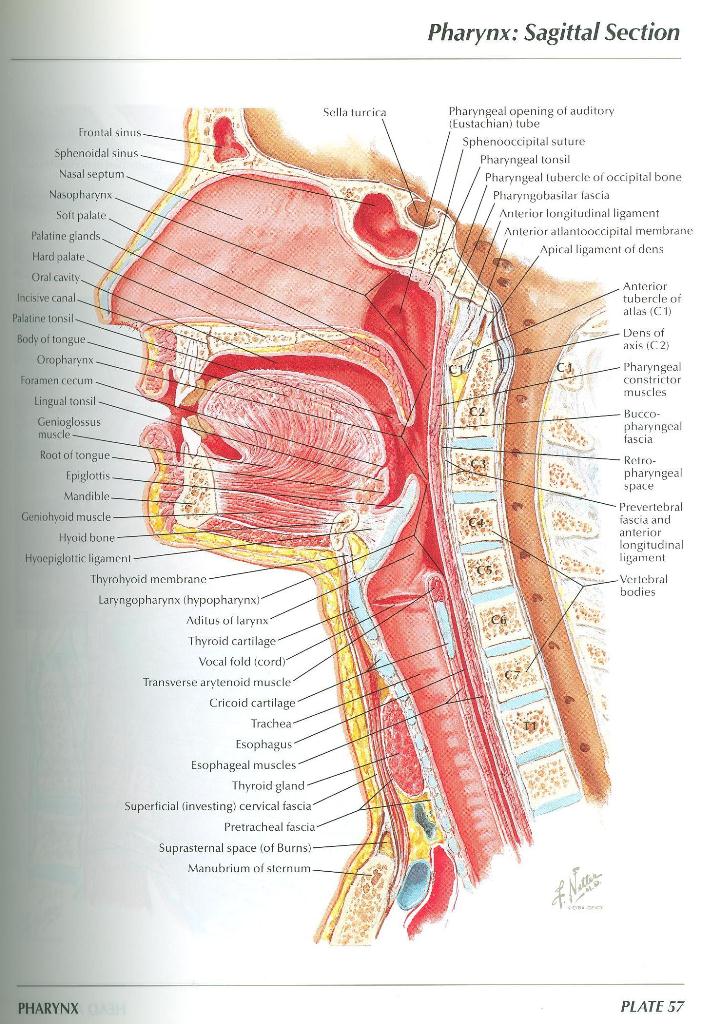
- Identify the hard palate and soft palate, which separate the nasal cavity from the oral cavity (Figure 57).
- The pharynx is the continuation of the digestive system posterior to the nasal and oral cavities, extending inferiorly posterior to
the larynx to the beginning of the esophagus. The pharynx extends from the base of the skull to the inferior border of the cricoid
cartilage anteriorly and to the inferior border of the C6 vertebra posteriorly. Identify the 3 parts of the pharynx (Figure 57):
- The nasopharynx is posterior to the choanae and superior to the soft palate
- The oropharynx is posterior to the tongue between the soft palate and the epiglottis
- The laryngopharynx is continuous with the oropharynx at the upper border of the epiglottis and narrows rapidly below at the level of the cricoid cartilage to become continuous with the esophagus at the border of the cartilage.
- Identify the larynx extending from the epiglottis anterior to the laryngopharynx and inferiorly to the lower border of the cricoid cartilage where it becomes continuous with the trachea.
The Pharynx, Larynx, and Trachea
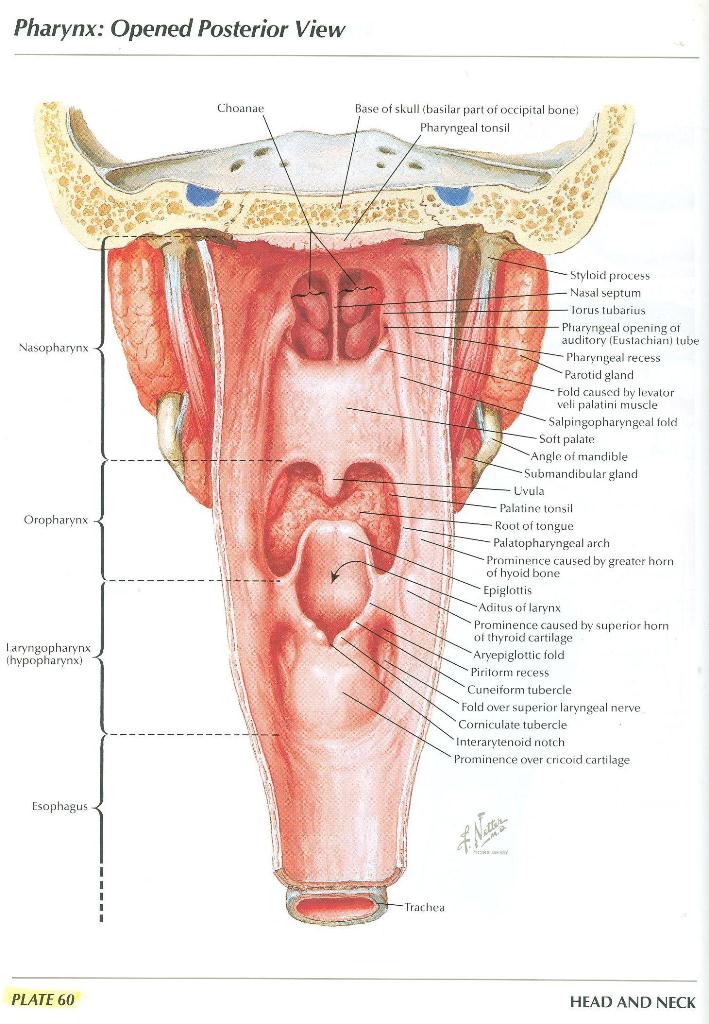
- The pharynx has been opened by a posterior longitudinal incision. Identify the 3 parts of the pharynx (Figure 60):
- The nasopharynx
- The oropharynx
- The laryngopharynx
- Identify the continuation of the laryngopharynx as the esophagus
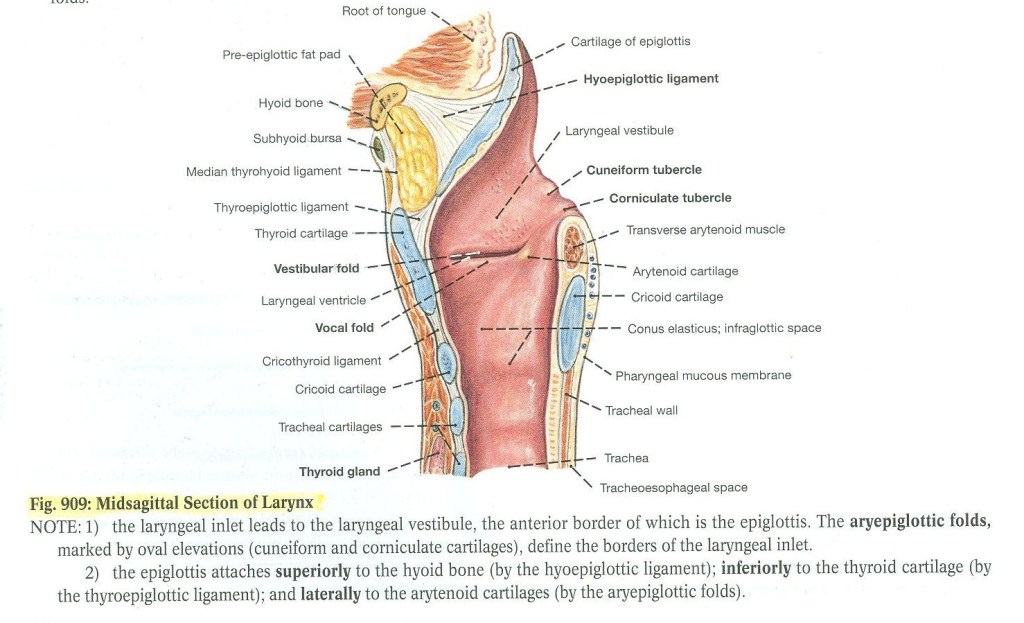
- The larynx is located in the anterior neck at the level of the bodies of vertebrae C3 - C6. The posterior wall of the larynx and the
upper part of the trachea has been split in the median plane and can be gently spread apart to study the laryngeal cavity. The laryngeal
cavity extends from the laryngeal inlet (aditus) to the lower border of the cricoid cartilage where it continues into the trachea. It can
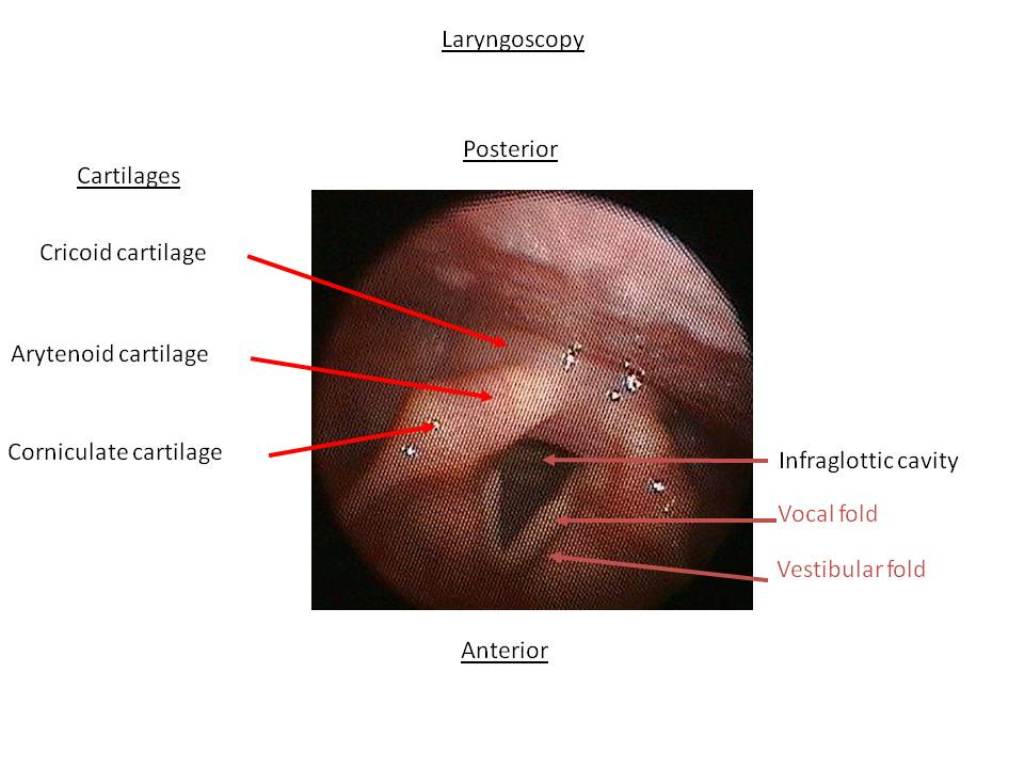
be divided into three parts (Figure 909):
- The vestibule extends from the laryngeal inlet to the vestibular folds. The aperture between the vestibular folds is the rima vestibuli.
- The ventricle or laryngeal sinus is the recess between the vestibular and vocal folds. The aperture between the vocal folds is the rima glottidis. It is the narrowest part of the larynx. Its width and shape vary with the movements of the vocal cords during respiration and phonation.
- The infraglottic cavity extends from the vocal folds to the lower border of the cricoid cartilage
Note: The pharynx and larynx have been studied during the Brain, Mind and Behavior block, so this section should serve as a nice review.
PULMONARY DISSECTION
Learning Objectives:
Upon completion of this assignment, the student should be able to:
Upon completion of this assignment, the student should be able to:
- Identify and describe the location of the lungs in the thoracic cavity.
- Identify the relations of the pulmonary artery, pulmonary veins, and the bronchi at the hilum of each lung.
- Define a bronchopulmonary segment and discuss its general organization.
- Identify the thoracic part of the trachea and describe its blood supply and innervations.
Overview
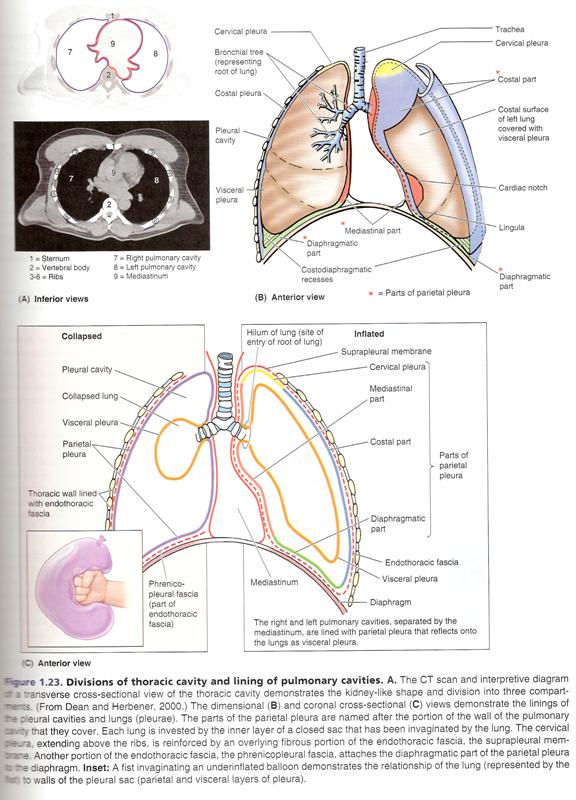
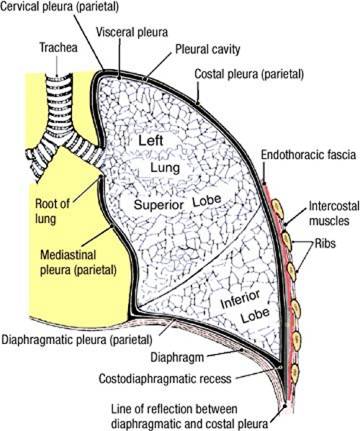
The parietal pleura has subdivisions that are regionally named:
- Costal parietal pleura - lines the inner surface of the thoracic wall
- Mediastinal parietal pleura - lines the mediastinum
- Diaphragmatic parietal pleura - lines the superior surface of the diaphragm
- Cervical parietal pleura (cupula) - extends superior to the first rib
The parietal pleura is sharply folded where the costal pleura meets the diaphragmatic pleura, and where the costal pleura meets the mediastinal pleura. The folds are called lines of pleural reflection. The lines of pleural reflection are acute, and the inner surfaces of the parietal pleurae are usually in contact with one another. The potential spaces where parietal pleura contacts parietal pleura are called pleural recesses. The two costomediastinal recesses (left and right) are located posterior to the sternum between the costal parietal pleura and the mediastinal parietal pleura. The two costodiaphragmatic recesses (left and right) are located at the most inferior limits of the parietal pleura between the costal parietal pleura and the diaphragmatic parietal pleura. During quiet inspiration, the inferior border of the lungs do not extend into the costodiaphragmatic recesses.
Dissection Instructions: Exploration of the Pleural Cavities
- The anterior part of the costal parietal pleura is attached to the inner surface of the removed anterior thoracic wall
- Explore the right and left pleural cavities. You may need to expand the opening in the chest wall. Caution: The cut ends of the ribs are sharp and can cut you. To reduce the risk of injury, use a mallet or the side of the bone cutters to hit and blunt the ends of ribs 1 to 7. As an additional precaution, place a terry cloth towel over the cut ends of the ribs before you begin to palpate the pleural cavities.
- Use a large syringe or cloth towel to remove fluid that may have collected in the pleural cavity.
- Identify the parts of the parietal pleura: costal, diaphragmatic, mediastinal, and cervical. Note that much of the mediastinal parietal pleura was removed to expose the phrenic and vagus nerves.
- Place your fingers in the costodiaphragmatic recess. Follow it posteriorly and notice the acute angle that the diaphragm makes with the inner surface of the thoracic wall.
- Place your hand between the lung and the mediastinum and palpate the root of the lung. At the root of the lung the mediastinal parietal pleura is continuous with the visceral pleura. The root of the lung is attached to the mediastinum. All other parts of the lung should slide freely against the parietal pleura. Pleural adhesions may occur between visceral and parietal pleurae. Pleural adhesions are the result of disease processes, and you should use your fingers to break them.

IN THE CLINIC: Pleural Cavity
Under pathological conditions, the potential space of the pleural cavity may become a real space. For example, if air enters the pleural cavity (pneumothorax), the lung collapses due to the elastic recoil of its tissue. Excess fluid may accumulate in the pleural cavity, compress the lung, and produce breathing difficulties. The fluid could be serous fluid (plural effusion) or blood resulting from trauma (hemothorax).
Under pathological conditions, the potential space of the pleural cavity may become a real space. For example, if air enters the pleural cavity (pneumothorax), the lung collapses due to the elastic recoil of its tissue. Excess fluid may accumulate in the pleural cavity, compress the lung, and produce breathing difficulties. The fluid could be serous fluid (plural effusion) or blood resulting from trauma (hemothorax).
IN THE CLINIC: Pleural effusion is an abnormal accumulation of fluid in the pleural space.
Normally, only a thin layer of fluid separates the two layers of the pleura. Fluid can accumulate in the pleural space as a result of a large number of disorders, including infections, injuries, heart failure, cirrhosis or liver failure, pneumonia, blood clots in the lung blood vessels (pulmonary emboli), cancer and drugs. Symptoms may include difficulty breathing and chest pain, particularly when breathing and coughing. Diagnosis is by chest x-rays, laboratory testing of the fluid, and often CT scan. Large amounts of fluid are drained with a tube inserted into the chest.
Normally, only a thin layer of fluid separates the two layers of the pleura. Fluid can accumulate in the pleural space as a result of a large number of disorders, including infections, injuries, heart failure, cirrhosis or liver failure, pneumonia, blood clots in the lung blood vessels (pulmonary emboli), cancer and drugs. Symptoms may include difficulty breathing and chest pain, particularly when breathing and coughing. Diagnosis is by chest x-rays, laboratory testing of the fluid, and often CT scan. Large amounts of fluid are drained with a tube inserted into the chest.
IN THE CLINIC: Pleural Tap (Thoracocentesis)
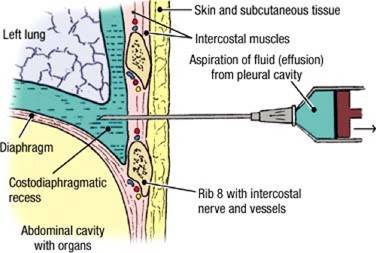 The aspiration of pathologic material from the pleural cavity (serous fluid, fluid mixed with tumor cells, blood, pus, etc.) may be done
through the intercostal space. The pleural tap is performed in the midaxillary line or slightly posterior to it. Usually, intercostal space
6, 7, or 8 is selected for the puncture to avoid penetrating abdominal viscera. A large-bore needle is inserted (See Figure) low in the
intercostal space to avoid injury to the intercostal nerve and vessels.
The aspiration of pathologic material from the pleural cavity (serous fluid, fluid mixed with tumor cells, blood, pus, etc.) may be done
through the intercostal space. The pleural tap is performed in the midaxillary line or slightly posterior to it. Usually, intercostal space
6, 7, or 8 is selected for the puncture to avoid penetrating abdominal viscera. A large-bore needle is inserted (See Figure) low in the
intercostal space to avoid injury to the intercostal nerve and vessels.
Dissection Review
- Replace the anterior thoracic wall in its correct anatomical position.
- Use an illustration and the dissected specimen to project the lines of pleural reflection to the anterior thoracic wall.
- Review the course of the intercostal nerves and understand that they are the source of somatic innervation (including pain fibers) to the costal parietal pleura.
Dissection Overview: The Lungs in situ
Dissection Instructions: The Lungs in situ
- Observe the lungs in situ.
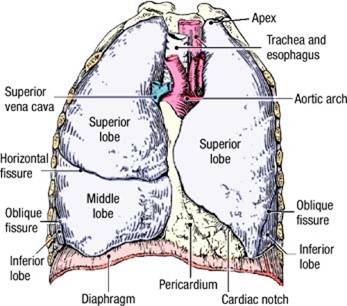
- Each lung has costal, mediastinal, and diaphragmatic surfaces. You can see only the costal surface with the lung in situ.
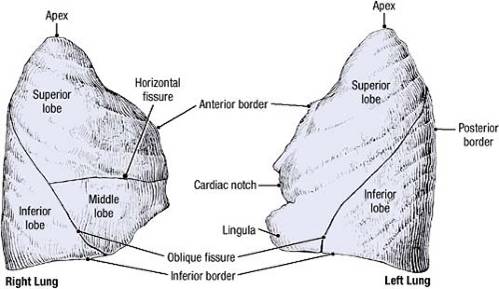
- Observe the oblique fissure on both lungs. Replace the anterior thoracic wall and observe that the oblique fissure lies deep to the fifth rib laterally and that it is deep to the sixth costal cartilage anteriorly. Clinicians may refer to the oblique fissure as the major fissure.
- Remove the anterior thoracic wall and identify the horizontal fissure on the right lung. Replace the anterior thoracic wall and observe that the horizontal fissure lies deep to the fourth rib and fourth costal cartilage. Clinicians may refer to the horizontal fissure as the minor fissure or transverse fissure.
- Note that the right lung has superior, middle, and inferior lobes. The left lung has two lobes (superior and inferior).
- Observe that the apex of the lung occupies the cupula of the pleura and that both rise as high as the neck of the first rib. Therefore, the apex of the lung and the cupula of the pleura lie superior to the plane of the superior thoracic aperture (aperture bordered by the superior border of the manubrium, first pair of ribs, and superior border of the first thoracic vertebra) and are actually located in the neck.
- Palpate the root of the lung. Feel the hard structures within the root of the lung. These are the pulmonary vessels filled with clotted blood, and the main (primary) bronchus.
- Review the location and course of the phrenic nerve passing inferiorly in the connective tissue between the mediastinal parietal pleura and the fibrous pericardium anterior to the root of the lung. Use an illustration to observe that the vagus nerve passes posterior to the root of the lung (in the same connective tissue plane).
IN THE CLINIC
The parietal pleura is richly innervated with pain fibers. The visceral pleura has no pain fibers.
The parietal pleura is richly innervated with pain fibers. The visceral pleura has no pain fibers.
Dissection Overview: The Bronchopulmonary Segments
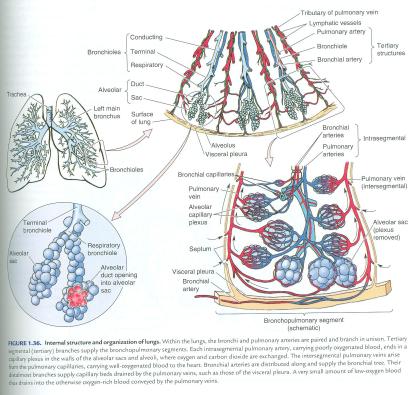
The pulmonary artery will follow an identical branching pattern, first dividing into lobar arteries, which in turn divide into segmental arteries, one for each bronchopulmonary segment. The segmental arteries closely follow the corresponding segmental bronchi. The superior and inferior pulmonary veins receive tributaries that form a similar branching pattern. However, at the level of the bronchopulmonary segments, the tributaries of the pulmonary veins are intersegmental, i.e., each passes between two adjacent bronchopulmonary segments, draining them both.
Dissection Instructions: The Bronchopulmonary Segments
- Preserve the phrenic and vagus nerves during the bronchopulmonary segment dissection (the
right vagus nerve may not have been dissected during the last laboratory session. Don't worry about it. It's not likely that you'll
damage it).
- Complete these dissections bilaterally. Place your hand into the pleural cavity between the lung and mediastinum. Retract the lung laterally to stretch the root of the lung. The nerve fibers found along the roots of the lungs are the anterior and posterior pulmonary plexuses. The pulmonary plexus is an autonomic plexus formed from pulmonary branches of the vagus nerve and the sympathetic trunk.
- Observe the layer of pleura enclosing the contents of the root of the lung, forming the transition between the mediastinal parietal pleura adhering to the fibrous pericardium and the visceral pleura on the lung surface. This portion of the pleura is referred to as the pleural sleeve. Gently strip the pleural sleeve from the main bronchus, pulmonary artery and pulmonary veins. The superior and inferior pulmonary veins are thin and delicate - take care not to destroy them.
- Note the relative positions of the structures composing the root of the lung. As a rough guide, the pulmonary arteries and veins are anterior to the main bronchus, with the pulmonary artery positioned superior to the pulmonary veins. However, note that as these structures approach the lungs and begin to divide into their lobar branches, their relationships become more mixed and varied.
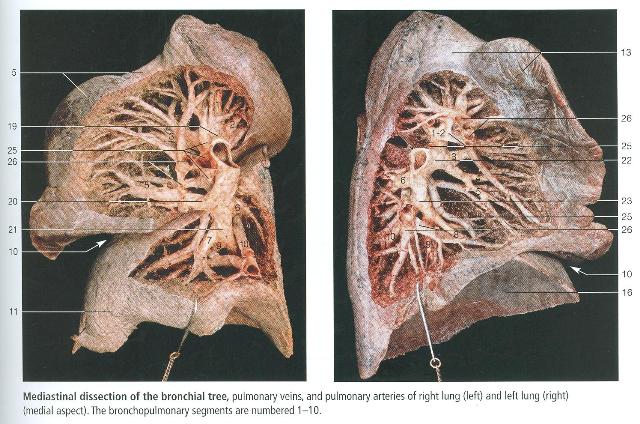
- Using blunt dissection, pick away at the spongy lung tissue bit by bit, following the bronchi and vascular branches into each lung until one complete bronchopulmonary segment, with its adjacent intersegmental veins, is exposed in each lung (refer to Rohen Bronchopulmonary Segments, note that this image depicts the dissection of most of the segments - we only want you to dissect one in each lung).
Dissection Instructions: Removal of the Lungs
- Preserve the phrenic nerve and vagus nerve during removal of the lungs.
- Once again, gently retract the lungs laterally. While retracting each lung, use scissors or a sharp scalpel to transect the root of the lung halfway between the lung and the mediastinum (just proximal to where the main bronchus and pulmonary artery begins to branch). Take care not to cut into the mediastinum or the lung.
- Remove each lung.
- Identify the costal, mediastinal, and diaphragmatic surfaces of the lungs.
- Identify the anterior, posterior, and inferior borders of the lungs.
- Recall that the lungs have a superior lobe and an inferior lobe separated by the oblique fissure. Observe the lungs from the lateral view, and note that most of the inferior lobe lies posteriorly and that most of the superior lobe lies anteriorly.
- Recall that the right lung has a horizontal fissure, which defines a small middle lobe. Identify the middle
lobe.
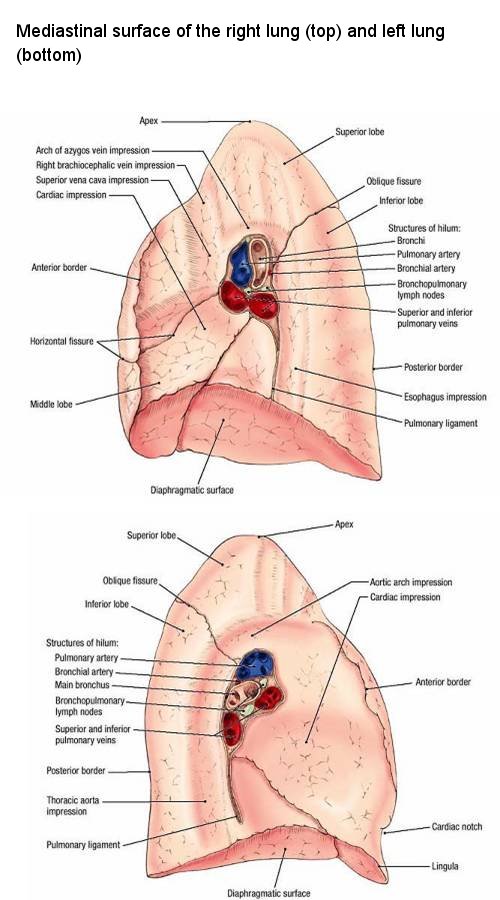
- NOTE: There are several contact impressions on the mediastinal surface of each lung. These impressions are artifacts of embalming and
illustrate the close proximity of the mediastinal structures to the lung. You are not required to identify them but you should appreciate
the close proximity of neighboring anatomical structures.
On the mediastinal surface of the right lung you will find contact impressions resulting from the close anatomical relationship the lung has with these following structures:- Cardiac impression
- Esophagus impression
- Arch of the azygos vein impression
- Superior vena cava impression
On the mediastinal surface of the left lung you will find contact impressions resulting from the close anatomical relationship the lung has with these following structures:- Cardiac impression
- Aortic arch impression
- Thoracic aorta impression
NOTE: While we are not expecting you to specifically identify these contact impressions, we want you to know them and realize that pathology of the lung can ultimately involve many important anatomical structures.
- Examine the hilum of each lung. Identify the main bronchus, pulmonary artery, and pulmonary veins. At the hilum, the main bronchus usually lies posterior to the pulmonary vessels, and the pulmonary artery is superior to the pulmonary veins. You should recognize this anatomical relationship in lungs that are cut ideally. However, note that if your cut is too far lateral, branching of these structures as they enter the lungs disrupts this orientation. If this is the case, you can distinguish the arteries from the veins by comparing the relative thickness of the walls of the vessels (the arteries have slightly thicker walls). To distinguish the main bronchus from the pulmonary vessels, look for cartilage in its wall.
- Carefully examine the transected main bronchus at the hilum of the lung. Note small pinholes along the circumference of the bronchial wall. These are the transected bronchial arteries, which supply the lungs with oxygenated blood from the thoracic aorta.
- In the right lung, identify the superior, middle, and inferior lobar bronchi. Note that the right superior lobar bronchus passes superior to the right pulmonary artery and, therefore, it is also called the "eparterial bronchus."
- In the left lung, identify the superior and inferior lobar bronchi. Note that the main bronchi divide into the lobar bronchi at the posterior position in the hilum of the left lung. The left pulmonary artery divides into lobar arteries at a superioanterior position. The left pulmonary veins enter the hilum at a inferioanterior position.
- The hilum of the lung contains lymph nodes, lymph vessels, and autonomic nerve fibers. Use an illustration to confirm this.
- Note that the lungs have a rich nerve supply via the anterior and posterior pulmonary plexuses. Sympathetic contributions are received from the right and left sympathetic trunks (to be identified later), while parasympathetic contributions are received from the right and left vagus nerves.
- After removing the lungs, compare them. You will note that the right lung is shorter, but has greater volume than the left lung. You should also compare the different contact impressions found on each lung.
Dissection Instructions: The Right Vagus Nerve
- If the right vagus nerve has not yet been dissected, this will be done now. Refer to Figure. The right vagus nerve lies deep (medial) to the mediastinal parietal pleura.
- Palpate the mediastinal parietal pleura overlying the trachea. You should feel a vertical ridge.
- Using blunt dissection (open scissor technique works well for this), dissect superoinferiorly along this ridge to expose the right vagus nerve.
- Note that, unlike the right phrenic nerve, which descends anterior to the root of the right lung, the right vagus nerve passes posterior to the root of the right lung.
Dissection Instructions: Exposure of the Tracheal Bifurcation
- Examine the proximal stump of the root of the lung (i.e., the portion of the root that's still in the cadaver) and identify the transected right main bronchus.
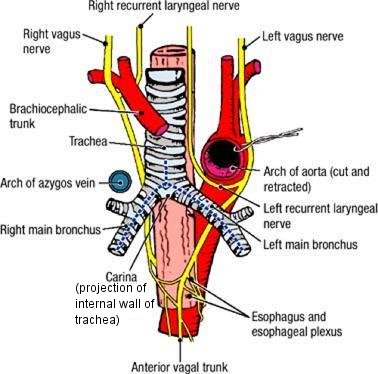
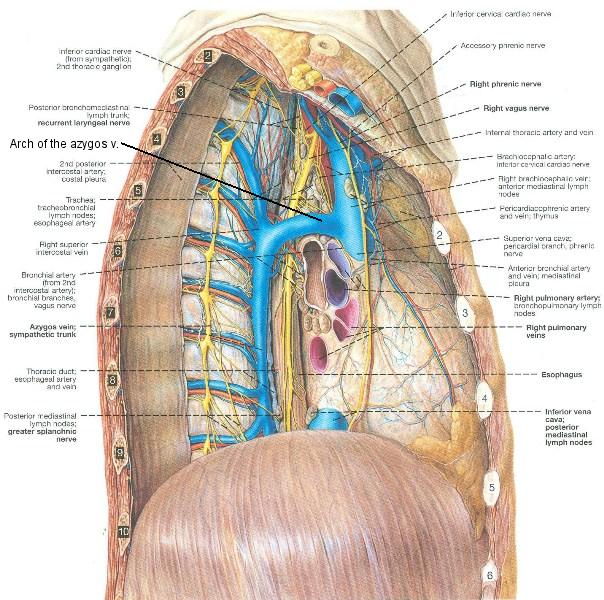
- Using blunt dissection, locate and clean the arch of the azygos vein, which passes superior to the right main bronchus to drain into the superior vena cava. The arch of the azygos vein and azygos system of veins will be examined in more detail during the posterior mediastinum laboratory session. Note that the right vagus nerve passes medial to the arch of the azygos vein.
- Taking care to preserve the arch of the azygos vein, dissect within the cleavage plane anterior to the main bronchus, and follow it proximally to expose the tracheal bifurcation. Clear the connective tissue around the tracheal bifurcation until you can clearly identify the trachea, and right and left main bronchi.
- Locate the deep part of the cardiac plexus lying anterior to the tracheal bifurcation.
- Observe that tracheobronchial lymph nodes are located around the trachea near its bifurcation.

- Compare the right and left main bronchi. Observe that the right main bronchus is larger in diameter, shorter, and oriented more vertically than the left main bronchus.
- Place the breast plate back onto the cadaver. Note that the trachea bifurcates within or close to the horizontal plane passing through the sternal angle.
- Palpate the anterior and posterior surfaces of the trachea near its bifurcation. Observe that the tracheal rings are C-shaped and that the open part of the "C" is located posteriorly.
- Observe that the esophagus is located posterior to the trachea in close relationship to the open part of the tracheal cartilages.
- Use scissors to make a longitudinal cut through the anterior surface of the right and left main bronchi (See Figure, dashed lines). The cuts should meet anterior to the tracheal bifurcation. Make a third cut superiorly through the anterior surface of the trachea for a distance of 2.5 cm. Inside the tracheal bifurcation, identify the carina (L. carina, keel of a boat). The carina is a specialized piece of tracheal cartilage. Because the trachea and bronchi are rigid, reflection is sometimes difficult. If necessary, you can cut out a small window through the anterior wall of the trachea and/or bronchus to help you see the carina.
- Place the lungs back into the cadaver.
IN THE CLINIC: Bifurcation of the Trachea
During bronchoscopy, the carina serves as an important landmark because it lies between the superior ends of the right and left main bronchi. The carina is usually positioned slightly to the left of the median plane of the trachea. When foreign bodies are aspirated, they usually enter the right main bronchus because of the leftward position of the carina, and because of the fact that the right main bronchus is wider and more vertically oriented than the left main bronchus.
During bronchoscopy, the carina serves as an important landmark because it lies between the superior ends of the right and left main bronchi. The carina is usually positioned slightly to the left of the median plane of the trachea. When foreign bodies are aspirated, they usually enter the right main bronchus because of the leftward position of the carina, and because of the fact that the right main bronchus is wider and more vertically oriented than the left main bronchus.
Dissection Review
- Review the parts of the lungs.
- Replace the lungs in their correct anatomical positions within the thoracic cavity.
- Replace the anterior thoracic wall. Review the relationship of the pleural reflections to the thoracic wall.
- Review the costomediastinal and costodiaphragmatic recesses.
POSTERIOR MEDIASTINUM DISSECTION
Learning Objectives:
Upon completion of this assignment, the student should be able to:
Upon completion of this assignment, the student should be able to:
- Define the boundaries of the posterior mediastinum
- Describe the major contents of the posterior mediastinum and their relationships.
- Describe the organization of the thoracic sympathetic trunk, in addition to its visceral and splanchnic branches.
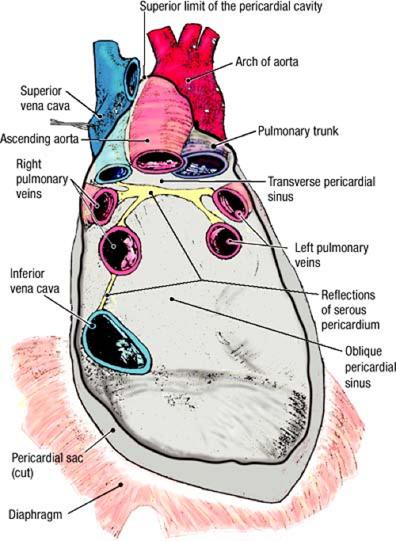
Dissection Overview
The order of dissection will be as follows: The pericardium will be reviewed and its posterior wall will be removed. The close relationship of the pericardium to the esophagus will be studied. The azygos vein and its tributaries will be studied. The thoracic duct will be identified. Then, the thoracic aorta and its branches will be dissected. Finally, the thoracic portion of the sympathetic trunk and its branches will be dissected.
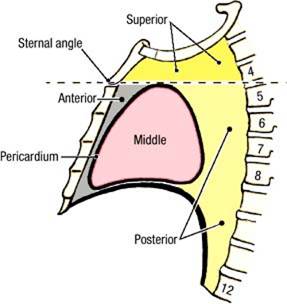
The boundaries of the posterior mediastinum:
- Superior - horizontal plane through the sternal angle
- Posterior - bodies of vertebrae T5 to T12
- Anterior - pericardium
- Lateral - mediastinal pleurae (left and right)
- Inferior - diaphragm
Dissection Instructions: The Esophagus, Thoracic Aorta, Thoracic Duct, Azygos Vein
- Review the inner surface of the posterior wall of the pericardium.
- Remove the posterior wall of the pericardium in the area of the oblique pericardial sinus. Identify the esophagus. The esophagus is a muscular tube that sits just
to the right of the midline.
- To the left and slightly posterior to the esophagus is the thoracic aorta. Use a probe to clean it from the surrounding connective tissue.
- Place the heart back into the pericardium. From the right side of the thorax, examine the relationship of the heart to the esophagus. Note that the esophagus lies immediately posterior to the left atrium and part of the left ventricle. Remove the heart. You have already heard about transesophageal echocardiography.
- Use blunt dissection to remove the remainder of the posterior wall of the pericardium. Leave the portion adhering to the diaphragm undisturbed. Use scissors to cut the pericardium at its attachments to the great vessels and diaphragm.
- Use blunt dissection to clean the esophagus. Note that the surface of the esophagus is covered by the esophageal plexus of nerves. The esophageal plexus innervates the inferior portion of the esophagus.
- Find the right vagus nerve in the angle formed by the arch of the azygos vein and the superior vena cava. Follow it posterior to the root of the right lung. Confirm that the fibers of the right vagus nerve spread out on the (mostly) posterior surface of the esophagus.
- Identify the left vagus nerve as it crosses the left side of the arch of the aorta. Follow the left vagus nerve posterior to the root of the left lung and confirm that its fibers contribute to the (mostly) anterior part of the esophageal plexus.
- Near the diaphragm, fibers of the esophageal plexus come together to form the anterior and posterior vagal trunks. The vagal trunks are found on the inferior part of the esophagus, just before they pass through the diaphragm. Identify the anterior vagal trunk and posterior vagal trunk. The vagal trunks pass through the diaphragm with the esophagus and innervate a large part of the gastrointestinal tract.
- Identify the arch of the azygos vein where it arches superior to the root of the right lung. Follow the arch of the azygos vein posteriorly to the azygos vein (See figure). Clean the azygos vein and follow it inferiorly to the level of the diaphragm.
- Identify the thoracic duct. To find the thoracic duct, retract the esophagus to the left and using craniocaudal blunt dissection,
explore the area between the azygos vein and the thoracic aorta. The thoracic duct lies immediately to the left of the azygos vein,
posterior to the esophagus (Structure #3 in thoracic duct dissection photo). The thoracic duct is thin-walled and easily torn. It has the
appearance of a small vein without blood in it.

- Use a probe to free the thoracic duct from the surrounding connective tissue as far superiorly and inferiorly as possible. The thoracic duct may be a network of several small ducts instead of a single duct. Note that, inferiorly, the thoracic duct passes through the diaphragm with the thoracic aorta, but do not dissect the duct inferiorly to that level. Superiorly, you have already seen the termination of the thoracic duct as it drains into the junction of the left internal jugular vein and left subclavian vein.
- The esophageal arteries and the left bronchial arteries are small unpaired vessels that arise from the anterior surface of the aorta. They are distinguished by their area of distribution. You do not have to identify them.
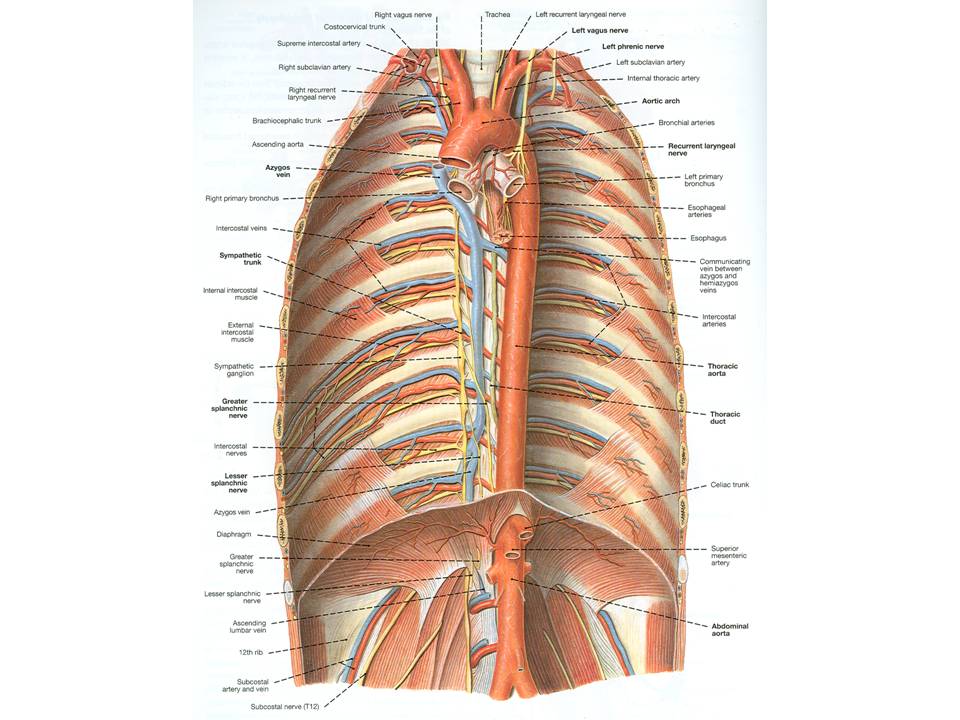
Dissection Instructions: The Posterior Intercostal Arteries, Sympathetic Trunk, Splanchnic Nerves
- Identify the arch of the azygos vein where it arches superior to the root of the right lung to drain into the posterior surface of the superior vena cava (See figure).
- Follow the arch of the azygos vein posteriorly to the azygos vein. Note that the posterior intercostal veins on the right side are tributaries to the azygos vein. Dissect and identify at least one posterior intercostal vein.
- On the left side of the posterior mediastinum, observe that the left posterior intercostal veins drain into the hemiazygos vein or accessory hemiazygos vein (See figure). The hemiazygos and accessory hemiazygos veins cross the bodies of the ninth and eighth thoracic vertebrae, respectively, and terminate by draining into the azygos vein. Note that variations of the azygos system are common.
- Dissect one pair of posterior intercostal arteries (right and left). Follow them to their intercostal space. The right posterior intercostal arteries cross the midline on the anterior surface of the vertebral bodies (See figure). Note that the right posterior intercostal arteries pass posterior to all other contents of the posterior mediastinum.
- Use your fingers to pick up the costal parietal pleura in the midaxillary line at the cut ends of ribs 1 to 7. Note that the endothoracic fascia provides a natural cleavage plane for separation of costal parietal pleura from the thoracic wall. Peel the costal parietal pleura off the inner surface of the posterior thoracic wall, moving from lateral to medial.
- Follow the costal parietal pleura further posteriorly until it contacts the sides of the vertebral bodies. At this location the costal parietal pleura becomes the mediastinal parietal pleura. Remove any remnants of the mediastinal parietal pleura.
- On both sides of the thorax, identify and clean one intercostal nerve. Follow it laterally until it disappears posterior to the innermost intercostal muscle.
- On one side of the thorax, identify the sympathetic trunk (See figure). Most of the time it will be more instructive to dissect the sympathetic trunk on the right side of the body. Starting high in the thorax, follow the sympathetic trunk inferiorly and observe that it crosses the heads of ribs 2 to 9. Inferior to rib 9, observe that the sympathetic trunk lies on the sides of the thoracic vertebral bodies.
- Observe that the sympathetic trunk has one sympathetic ganglion for each thoracic vertebral level.
- Two rami communicantes (white ramus communicans, gray ramus communicans) connect each intercostal nerve with its corresponding thoracic sympathetic ganglion. Find at least one rami communicans, but make an attempt to find two at a single level. During dissection, it is impossible to distinguish white and gray rami from each other based on color. However, if you do find two at one level, the more lateral of the two rami is the white ramus communicans. Note that in most cases only one ramus will be easily seen.
- Use a probe to dissect the greater splanchnic nerve on one side (See figure). Note that the greater splanchnic nerve receives contributions from the fifth through the ninth thoracic sympathetic ganglia and that it is not completely formed until lower thoracic levels. As an aid to identification, observe that the greater splanchnic nerve is found on the sides of vertebral bodies T5 to T9, while the sympathetic trunk crosses the heads of ribs 5 to 9 (i.e., the sympathetic trunk is located posterior to the greater splanchnic nerve).
- The lesser splanchnic nerve arises from the 10th and 11th thoracic sympathetic ganglia. The least splanchnic nerve arises from the 12th thoracic sympathetic ganglion. Due to the curvature of the diaphragm, these two nerves cannot be seen at this time.
Dissection Review
- Review the boundaries of the anterior, middle, and posterior mediastinum.
- Study a transverse section through the midlevel of the thorax and identify the contents of the posterior mediastinum. Note the relationship of the contents of the posterior mediastinum to the heart and vertebral bodies.
- Review the course and function of an intercostal nerve, naming all structures that it innervates.
- Review the parts of the aorta (ascending, arch, thoracic), naming all branches and describing their distribution.
- Review the origin and course of the right and left posterior intercostal arteries.
- Name the structures in the posterior mediastinum that course anterior to the right posterior intercostal arteries.
- Review the formation of the superior vena cava and the position of the arch of the azygos vein.
FOCUS QUESTIONS
[CLICK HERE FOR A LINK TO THE FOCUS QUESTIONS WITH ANSWERS]
- Are there plexuses of nerves on the pulmonary arteries?
- Determine the relation of the left superior intercostal vein to the aortic arch, the phrenic nerve, and vagus nerves.
- Pull the aortic arch toward the left and observe the thoracic portion of the trachea. What innervates it and how?
- What is the blood supply of the trachea? What structure does it lie upon?
- Locate the right and left bronchial arteries. What is their source? How do the two sides differ in number?
- What is the difference between the "root" of the lung and the "hilum"?
- How do the cardiac and pulmonary plexuses differ? Where do they distribute?
- Where and what is the cardiac notch?
- What is the average projection of each lung and its fissures to the rib cage?
- What is the lingular bronchus?
- What is its significance of the superior segmental branch of the right inferior lobar bronchus?
- Are there sympathetic branches to the lung? Along what do they distribute?
- Where does the esophagus begin? Where does it pass into the abdomen? Where does it terminate?
- Consider the course, relations, constrictions of the esophagus.
- Describe the blood supply and venous drainage of the esophagus. Are there venous collaterals to stomach?
- Do the right and left mediastinal pleurae come together?
- Through what and at what level does the aorta enter the abdominal cavity?
- What is the subcostal artery?
- Completely review the blood supply to an intercostal space.
- What are the posterior branches of the posterior intercostal (segmental) arteries? What do they supply?
- Observe the azygos venous system. If you have two primary veins, do they communicate with one another? How? Where? What is the
pattern of venous drainage in your specimen? Are all the veins present? If not, where does the drainage go?
- What vein drains the first intercostal space? Into what does it drain? What veins drain into the azygos system?
- How does the thoracic duct get into the thorax? At what level does it deviate to the left side?
- Do you find posterior mediastinal lymph nodes or afferent lymph channels?
- What are bronchomediastinal lymph trunks?
- Is the sympathetic trunk located within the posterior mediastinum? Does it change positions in different regions of the chest?
- How many thoracic ganglia do you find?
- Identify white and gray rami communicans. What is their significance and distribution? What do they contain?
- Do you see thoracic visceral nerves to the aorta, esophagus, and trachea? What about to the cardiac and pulmonary plexuses?
- Expose the greater (thoracic) splanchnic nerve. From what does it come? At what level? What types of fibers does it contain? To what
does it distribute?