OVERVIEW OF THE THORAX
The main function of the thorax is to house and protect the heart and lungs, as well as to protect the upper gastrointestinal tract. The
protective function of the thoracic wall is combined with mobility to accommodate volume changes during respiration. These two dissimilar
functions, protection and flexibility, are accomplished by the alternating arrangement of the ribs and intercostal muscles.
The superficial fascia of the thorax contains the usual elements that are common to superficial fascia in all body regions: blood vessels, lymph vessels, cutaneous nerves, and sweat glands. In addition, the superficial fascia of the anterior thoracic wall in the female contains the mammary glands, which are highly specialized organs unique to the superficial fascia of the thorax.
The thorax has two apertures. The superior thoracic aperture (thoracic inlet) is relatively small and bounded by the manubrium of the sternum, the right and left first ribs, and the body of the first thoracic vertebra. Structures pass between the thorax, the neck, and the upper limb through the superior thoracic aperture (e.g., trachea, esophagus, vagus nerves, thoracic duct, major blood vessels).
The inferior thoracic aperture (thoracic outlet) is larger and bounded by the xiphisternal joint, the costal margin, ribs 11 and 12, and the body of vertebra T12. The diaphragm attaches to the structures that form the boundaries of the inferior thoracic aperture and it separates the thoracic cavity from the abdominal cavity. Several large structures (e.g., aorta, inferior vena cava, esophagus, vagus nerves) pass between the thorax and abdomen through openings in the diaphragm.
The thorax contains the lungs (right and left) and the mediastinum. The two lungs occupy the lateral parts of the thoracic cavity. The mediastinum (L. quod per medium stat, that which stands in the middle) is the region between the lungs. It contains the heart, aorta, trachea, esophagus, and other structures that pass to or from the head and neck.
OSTEOLOGY: SKELETON OF THE THORAX
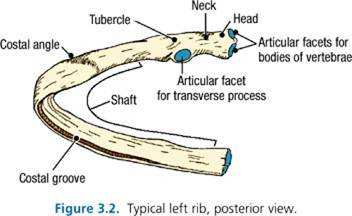
- Head
- Neck
- Tubercle
- Costal angle
- Shaft (body)
- Costal groove
- The first rib is the highest, shortest, broadest, and most sharply curved rib.
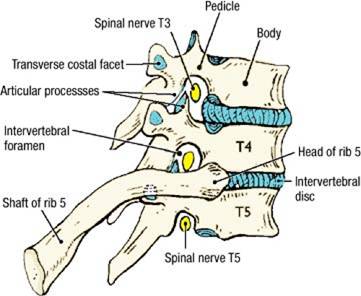
- The head of a rib usually articulates with two vertebral bodies and their intervertebral disc. For example, the head of rib 5 articulates with vertebral bodies T4 and T5. The 1st, 10th, 11th, and 12th ribs are exceptions to this rule. Their heads articulate only with the same-numbered vertebral body (e.g., the head of rib 11 articulates with the vertebral body of T11 only).
- The tubercle of a rib articulates with the transverse costal facet on the transverse process of the thoracic vertebra of the same number. A costal cartilage is attached to the anterior end of each rib.
- True ribs (ribs 1 to 7) - costal cartilage is attached directly to the sternum.
- False ribs (ribs 8 to 10) - costal cartilage is attached to the costal cartilage of the rib above.
- Floating ribs (ribs 11 and 12) - costal cartilage is not attached to a skeletal element, but ends in the abdominal musculature.
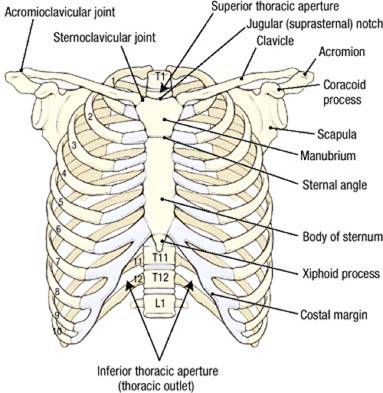
- Jugular notch (suprasternal notch)
- Manubrium (L. manubrium, handle)
- Sternal angle (at the attachment of the second costal cartilage; also at the level of the T4/T5 intervertebral disc)
- Body of the Sternum
- Xiphoid process (Gr. xiphos, sword)
- Acromion
- Coracoid process
SURFACE ANATOMY
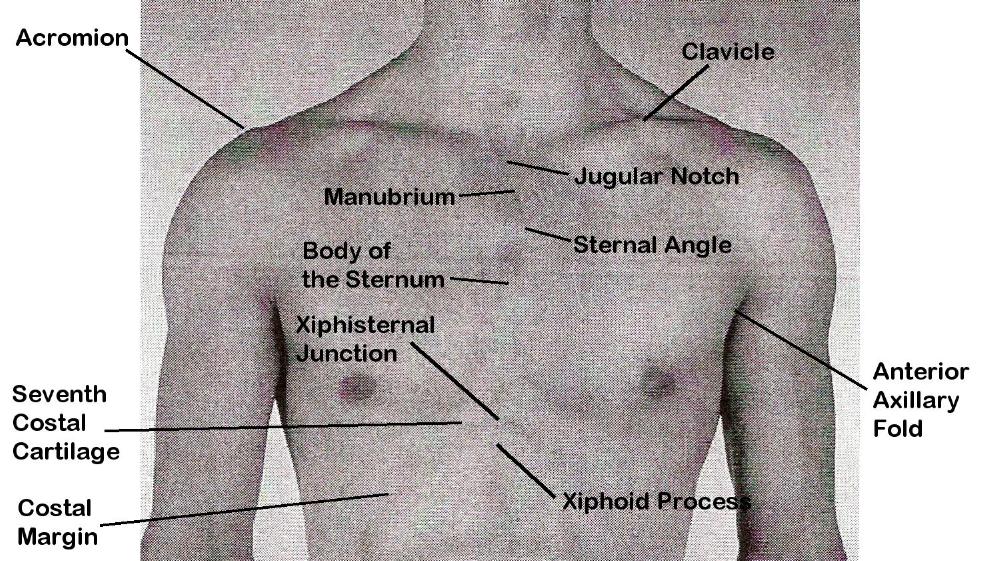 The surface anatomy of the thorax can be studied on a living subject or on the cadaver. Turn the cadaver to the supine position and palpate
the following structures:
The surface anatomy of the thorax can be studied on a living subject or on the cadaver. Turn the cadaver to the supine position and palpate
the following structures:
- Clavicle
- Acromion of the scapula
- Jugular notch (suprasternal notch)
- Manubrium
- Sternal angle
- Body of the sternum
- Xiphisternal junction
- Xiphoid process
- Seventh costal cartilage
- Costal margin
- Anterior axillary fold (lateral border of the pectoralis major muscle)
DISSECTION ASSIGNMENT: THE ANTERIOR THORACIC WALL AND THE HEART IN SITU
Learning Objectives:
- Describe the framework of the thorax, including the sternum and its parts.
- Diagram a typical intercostal space, including muscles, nerves, and vessels.
- Identify and describe the mediastinum, including its boundaries and subdivisions.
- Distinguish between fibrous pericardium, parietal serous pericardium and visceral serous pericardium.
- Identify the contents of the anterior mediastinum.
- Describe the pericardial sac and its spaces.
- Identify the sternocostal projections of the heart, in addition to its borders, surfaces, and sulci.
- Identify the arterial blood supply and venous drainage of the heart.
Dissection Overview: Pectoral Region
As you recall from the Musculoskeletal-Integumentary Block, the pectoral region (L., pectus, chest) covers the anterior thoracic wall
and part of the lateral thoracic wall. In order to prepare the cadaver for removal of the anterior thoracic wall, you will repeat a portion
of the pectoral region dissection. The M1 class will be studying the pectoral muscles in your cadaver later. Anatomical details will
be provided in brackets for your interest but the main goal of this section is to detach the pectoralis major, pectoralis minor, and serratus
anterior muscles medially and reflect these muscles out of the way while preserving the muscles, pectoral nerves, anterior cutaneous branches, long
thoracic nerve, lateral thoracic artery, and cephalic vein for the benefit of the first-year students. The order of dissection will be as
follows: The superficial fascia will be removed in cadavers of both sexes. The pectoralis and the serratus anterior muscles will be detached
medially and reflected.
Dissection Instructions
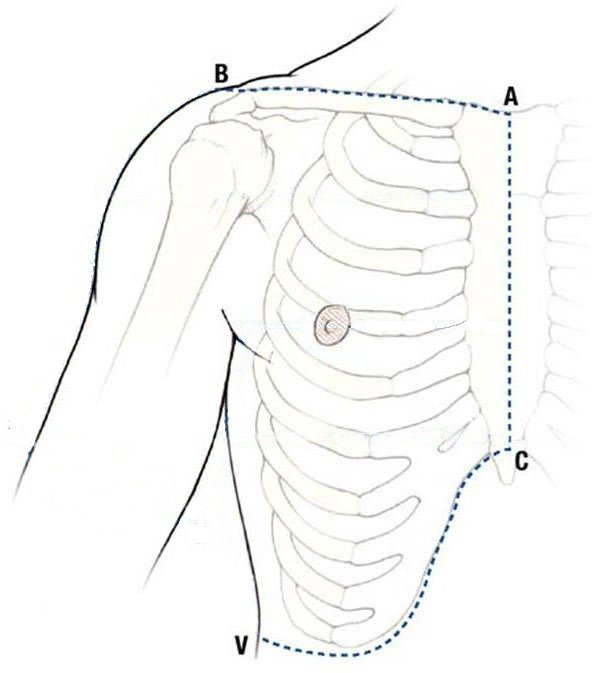
- Use a sharp scalpel to make a midline incision from the jugular notch (A) to the xiphosternal junction (C).
- Make a transverse incision from the jugular notch (A) along the clavicle to the acromion (B).
- Make a transverse incision from the xiphosternal junction (C) along the costal margin to the midaxillary line (V). Don't cut too deep. Only cut skin in order to preserve the serratus anterior muscle, long thoracic nerve, and lateral thoracic artery.
- Starting near the midline, reflect each flap of skin and superficial fascia from medial to lateral; the plane of dissection should be between the superficial fascia of the skin and the deep fascia of the pectoralis major muscle. Just lateral to the sternum, take note of any anterior cutaneous branches of the intercostal nerves and anterior intercostal vessels as they are ligated. Preserve these structures for the M1 students.
- Stay away from the deep structures of the axilla, especially the brachial plexus.
- Near the midaxillary line, pull the skin and superficial fascia laterally.
- Between the lateral thoracic wall and the axilla, find the intercostobrachial nerve, which, as you recall, is the lateral cutaneous branch of the second intercostal nerve (T2) and, therefore, will exit between ribs 2 and 3 on its way to the skin of the axilla and medial side of the arm. Recall that this nerve has clinical importance because of its association with referred pain during a heart attack.
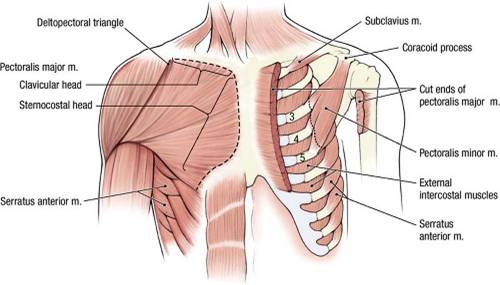
- Use your fingers to define the borders of pectoralis major muscle.
- Identify the two heads of the pectoralis major muscle: clavicular head and sternocostal head. [Recall that the juncture of these two heads is at the sternoclavicular joint].
- Relax the sternocostal head of the pectoralis major muscle by flexing and adducting the arm. Gently insert your fingers posterior to the inferior border of the pectoralis major muscle. Create a space between the posterior surface of the pectoralis major and the clavipectoral fascia. Push your fingers superiorly to open this space.
- Use scissors to detach the sternocostal head of the pectoralis major muscle from its attachment to the sternum (Refer to dashed line on the right side of the figure).
- Palpate the deep surface of the pectoralis major muscle to locate the medial and lateral pectoral nerves. Preserve these nerves.
- Use scissors to cut the clavicular head of the pectoralis major muscle close to the clavicle.
- Preserve the cephalic vein. Gently reflect the pectoralis major muscle laterally.
- Deep to the pectoralis major muscle are the clavipectoral fascia and pectoralis minor muscle.
- Use scissors to detach the pectoralis minor muscle from its proximal attachments on ribs 3 to 5 (Refer to dashed line on the left side of the figure).
- Reflect the pectoralis minor muscle superiorly. Leave the muscle attached to the coracoid process of the scapula.
- Identify the serratus anterior muscle. Detach the serratus anterior muscle from its proximal attachments to the upper eight ribs. Be careful not damage the lateral thoracic artery or long thoracic nerve, which run inferiorly on its superficial surface.
Dissection Overview: Intercostal Space and Intercostal Muscles
The interval between adjacent ribs is called an intercostal space. An intercostal space is truly a space only in a skeleton, as three
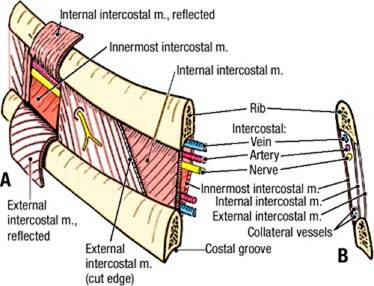
layers of muscle fill an intercostal space in the living body and the cadaver. From superficial to deep, the three layers of muscle are
the external intercostal muscle, internal intercostal muscle, and innermost intercostal muscle.
There are 11 intercostal spaces on each side of the thorax. Each is numbered according to the rib that forms its superior boundary. For example, the fourth intercostal space is located between ribs 4 and 5.
The order of dissection will be as follows: The external intercostal muscle and external intercostal membrane will be studied in the fourth intercostal space. The external intercostal membrane will be reflected to expose the internal intercostal muscle in the fourth intercostal space. The innermost intercostal muscle will be identified in the thoracic cavity after you have removed the anterior thoracic wall.
Dissection Instructions
- Palpate the ribs and the intercostal spaces. Begin at the level of the sternal angle (attachment of the second costal cartilage) and identify each intercostal space by number.
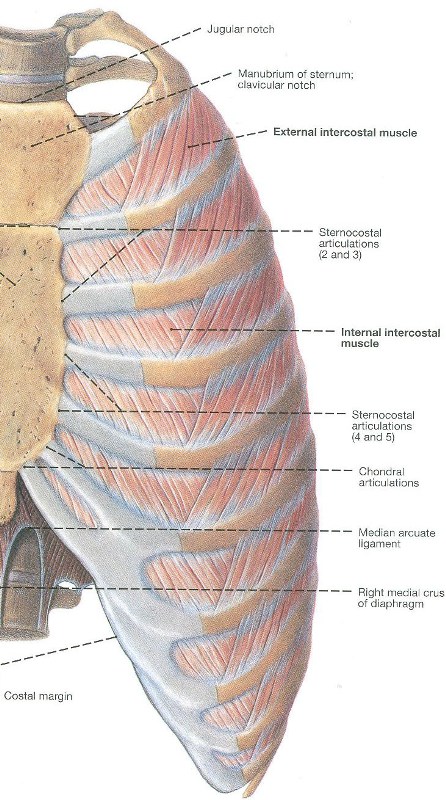
- Identify the external intercostal muscle. The external intercostal muscle attaches to the inferior border of the rib above and the superior border of the rib below. The external intercostal muscle elevates the rib below during inspiration. Note that the fibers of the external intercostal muscles pass diagonally toward the anterior midline as they descend.
- Identify the external intercostal membrane, which is located at the anterior end of the intercostal space between the costal cartilages. Note that the fibers of the external intercostal muscle end at the lateral edge of the external intercostal membrane (i.e. they are essentially a single layer of tissue).
- Insert a probe deep to the external intercostal membrane just lateral to the border of the sternum in the fourth intercostal space.
- With the probe as a guide, use scissors to cut the external intercostal membrane from the rib above and reflect it inferiorly. Continue the cut laterally to the external intercostal muscle.
- Identify the internal intercostal muscle. The internal intercostal muscle attaches to the superior border of the rib below and the inferior border of the rib above. The internal intercostal muscle depresses the rib above during expiration. Note that the fiber direction of the internal intercostal muscle is perpendicular to the fiber direction of the external intercostal muscle.
Dissection Overview: Removal of the Anterior Thoracic Wall
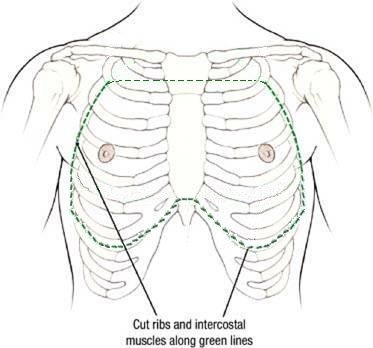
To view the contents of the thoracic cavity, the anterior thoracic wall must be removed. The structures to be removed include the inferior
portion of the manubrium, the body of the sternum, the anterior and lateral portions of ribs 2 through 7, and the contents of intercostal
spaces 1 to 7.
The order of dissection will be as follows: The costal cartilages and sternum will be cut at the level of the xiphisternal joint. The ribs and contents of the intercostal spaces will be cut at the midaxillary line. The manubrium will be transected, and the soft tissue of intercostal spaces #1 and #7 will be divided. The thoracic wall will be removed and the inner surface of the thoracic wall will be studied.
Dissection Instructions
- At the level of the xiphisternal joint (approximately at the level of intercostal space 6), use a Stryker electric saw to make a transverse cut across the sternum and costal cartilages. Allow the saw to pass through the bone and cartilage, but not into the deeper tissues. Make a similar transverse cut through the manubrium. The transverse cut through the manubrium should be made as superior as possible, but inferior to the 1st sternocostal joints, the sternoclavicular joints and the inferior attachments of the sternocleidomastoid muscles. If you have trouble palpating the first ribs, the transverse cut through the manubrium should be about mid-way from superior to inferior. If you have already cut or removed the manubrium and/or clavicle during your head and neck dissection, you may have to adjust these instructions accordingly.
- Use a Stryker saw to cut ribs 2 to 7 in the midaxillary line on both sides of the thorax. The bone cutters may also be used but these tend to create ribs with sharp edges. Make your cut just anterior to the intercostobrachial nerves. Please be careful to preserve the origin and course of the intercostobrachial nerves. Be careful not cut into the deeper tissues.
- With a scalpel, make a series of vertical cuts through the muscles in intercostal spaces 2 to 6 in the midaxillary line on both sides. The cuts should be aligned with the cut ribs. Make the cut deep enough to cut the muscles, but not the deeper tissues. Again, make your cut anterior to the intercostobrachial nerves.
- Use scissors to detach the intercostal muscles from the upper border of rib 8 on both sides of the thorax. Make a similar cut through the intercostal muscles between ribs 1 and 2.
- Gently, elevate the inferior end of the sternum along with the attached portions of the severed costal cartilages and ribs. Near the lower end of the sternum, identify the right and left internal thoracic arteries and veins. Cut the internal thoracic vessels at the level of the seventh sternocostal joint.
- Continue to elevate the inferior end of the thoracic wall.
- Cut the internal thoracic vessels between the first and second ribs. Remove the anterior thoracic wall with the internal thoracic vessels attached.
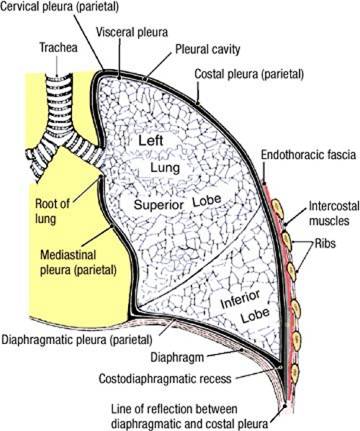
- On the inner surface of the removed anterior thoracic wall, identify the parietal pleura. The part of the parietal pleura that is attached to the ribs is called costal parietal pleura. It is attached to the ribs by a thin layer of fibroareolar tissue called endothoracic fascia. The pleura will be covered in more detail during the Renal and Pulmonary Block.
- Identify the transversus thoracis muscle. Observe that the inferior attachment of the transversus thoracis muscle is on the sternum and its superior attachments are on costal cartilages [FYI, costal cartilages 2 to 6]. The transversus thoracis muscle depresses the ribs during expiration.
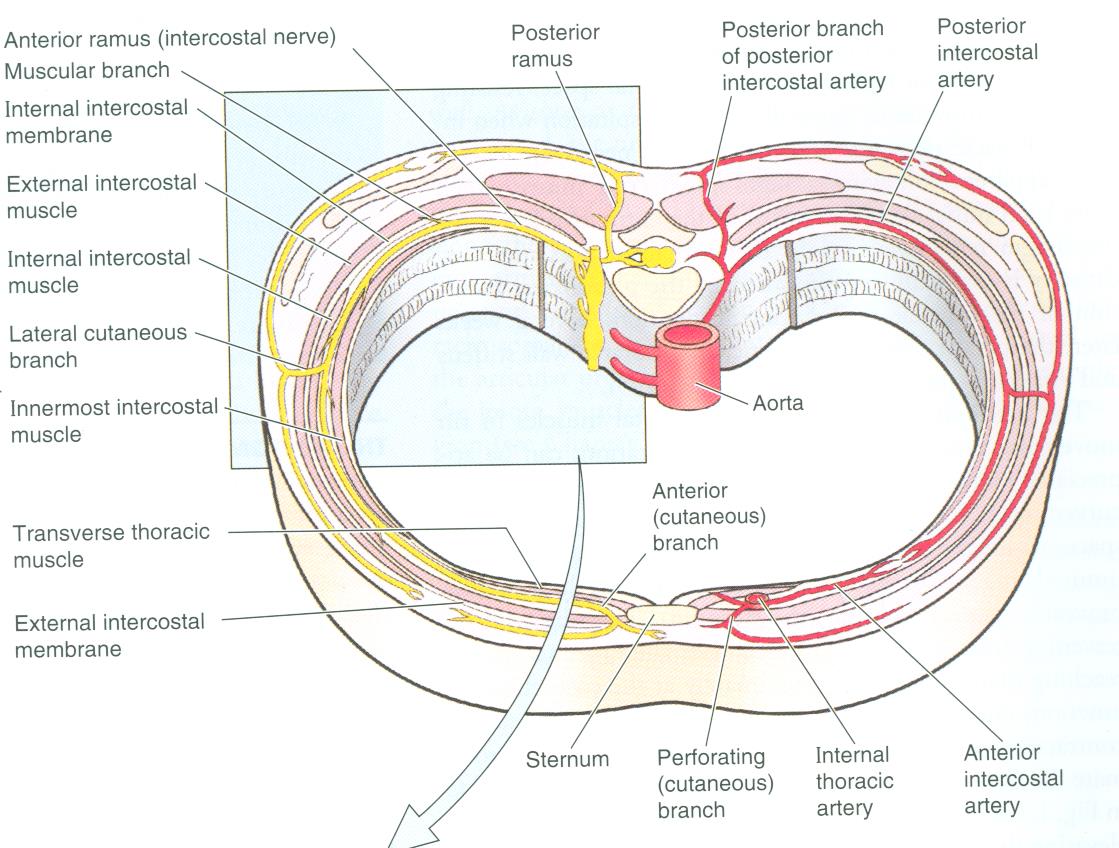
- The internal thoracic artery (often referred to as the internal mammary artery by clinicians) and veins are located between the transversus thoracis muscle and the costal cartilages.
- Follow the internal thoracic artery inferiorly and identify at least one of its lateral branches called the anterior intercostal arteries.
- The anterior intercostal arteries anastomose with the posterior intercostal arteries, which originate from the aorta. Each posterior intercostal artery and vein travel along with an intercostal nerve within a costal groove, deep to the inferior border of their respective rib. The posterior intercostal vessels and the intercostal nerves will be studied in more detail during the Renal and Pulmonary Block.
- Along the inferior border of one rib, use a blunt probe or the open-scissor technique to remove the costal parietal pleura to expose an intercostal nerve, anterior and posterior intercostal arteries, and anterior and posterior intercostal veins. You will not be able to reliably distinguish between the anterior and posterior intercostal arteries because they form an anastomotic connection but you should appreciate that the anterior thoracic wall has a dual blood supply from both the thoracic aorta (via posterior intercostal arteries) and the internal thoracic artery (via anterior intercostal arteries). Note that these structures typically lie in VAN order (i.e., vein, artery, nerve) from superior to inferior, within the costal groove. Note that one of you can perform this dissection while your teammates proceed to the mediastinum dissection in the next section.
- Follow the posterior intercostal arteries, posterior intercostal veins, and intercostal nerves laterally until they pass anterior to a layer of muscle. This muscle, positioned posterior to the arteries, veins, and nerves is the innermost intercostal muscle. (Note that if you cut the breast plate too far anteriorly, you may not see the innermost intercostal muscle). The innermost intercostal muscle attaches to the superior border of the rib below and the inferior border of the rib above. The innermost intercostal muscle depresses the rib above during expiration. Note that the fiber direction of the innermost intercostal muscle is parallel to that of the internal intercostal muscle and perpendicular to the fiber direction of the external intercostal muscle.
- Posterior to the sixth or seventh costal cartilage, the internal thoracic artery divides into two terminal branches, the superior epigastric artery and the musculophrenic artery (See figure). Find this bifurcation of the internal thoracic artery on the cadaver (rather than on the thoracic wall specimen).
- The intercostal neurovascular structures pass laterally to intercalate between the internal and innermost intercostal muscles. Consequently, the plane between these two muscles is often referred to as the neurovascular plane.
Clinical Correlation: Anterior Thoracic Wall
The anterior and lateral approaches to the contents of the thorax are the two most common surgical approaches. In the anterior approach, the sternum is split vertically in the midline. This approach does not cross major vessels and allows good access to the heart. The incision through the sternum is closed with stainless steel wires. In the lateral approach, an intercostal space is incised to provide access to the lungs or to structures posterior to the heart.
The anterior and lateral approaches to the contents of the thorax are the two most common surgical approaches. In the anterior approach, the sternum is split vertically in the midline. This approach does not cross major vessels and allows good access to the heart. The incision through the sternum is closed with stainless steel wires. In the lateral approach, an intercostal space is incised to provide access to the lungs or to structures posterior to the heart.
Dissection Review
- Review the muscles that lie in the intercostal space. Review their actions. Understand how they assist respiration by elevating and depressing the ribs.
- Use an illustration and your dissected specimen to review the origin, course, and branches of the posterior intercostal artery and intercostal nerve.
- Use an illustration and your dissected specimen to review the origin and course of the anterior intercostal artery.
- Consult a dermatome chart and compare the dermatome pattern to the distribution of the intercostal nerves.
Overview of the Mediastinum
The region between the two lungs is the mediastinum, which contains the pericardial sac and heart. Before you open the pericardial sac and
identify its features, you should review and study the subdivisions of the mediastinum.
The boundaries of the mediastinum are:
- Superior boundary - superior thoracic aperture, the communication between the thorax and the neck, surrounded by the superior border of the manubrium, first ribs, and the superior border of the T1 vertebra.
- Inferior boundary - diaphragm
- Anterior boundary - sternum
- Posterior boundary - bodies of vertebrae T1 to T12
- Lateral boundaries - parietal pleura (See figure), which are the serous membranes that line the walls of the spaces surrounding the lungs. The portion of the parietal pleura that adheres to the walls of the mediastinum is referred to as mediastinal parietal pleura. The pleura will be described in more detail during the Renal and Pulmonary Block.
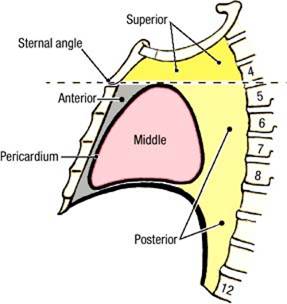
For descriptive purposes, the mediastinum is divided into four parts. An imaginary transverse plane at the level of the sternal angle intersects the intervertebral disk between vertebrae T4 and T5 and separates the superior mediastinum from the inferior mediastinum. The pericardium then divides the inferior mediastinum into three parts:
- Anterior mediastinum - the part that lies between the sternum and the pericardium. In children and adolescents, part of the thymus may be found in the anterior mediastinum. In adults, the thymus has likely been replaced by fat.
- Middle mediastinum - the part that contains the pericardium, the heart, and the roots of the great vessels.
- Posterior mediastinum - the part that lies posterior to the pericardium and anterior to the bodies of vertebrae T5 to T12. The posterior mediastinum contains structures that pass between the neck, thorax, and abdomen (esophagus, vagus nerves, azygos system of veins, thoracic duct, thoracic aorta).
The plane of the sternal angle is an important thoracic landmark that marks the level of the:
- Boundary between the superior and inferior mediastinum
- Superior border of the pericardium
- Bifurcation of the trachea
- End of the ascending aorta
- Beginning and end of the arch of the aorta
- Beginning of the thoracic aorta
It is worth noting that some structures that course through the mediastinum (esophagus, vagus nerve, phrenic nerve, and thoracic duct) pass through more than one mediastinal subdivision.
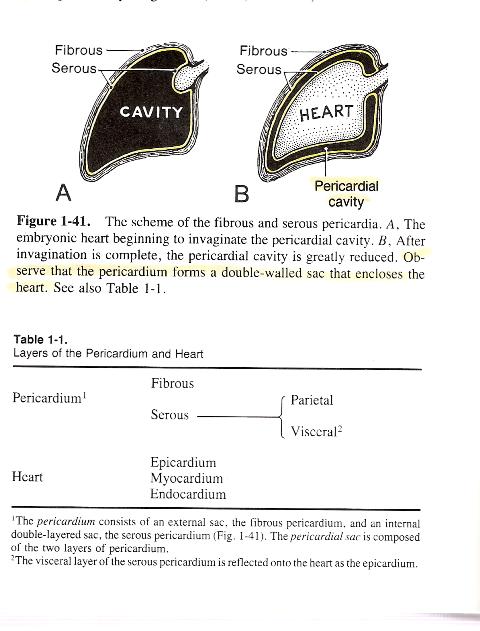
Overview of the Pericardium
The pericardium is a continuous sac of fibrous and serous tissue that surrounds the heart (see schematic view of pericardium).
Within the sac is the pericardial cavity, a potential space that normally contains only a thin film of pericardial fluid, a lubricant
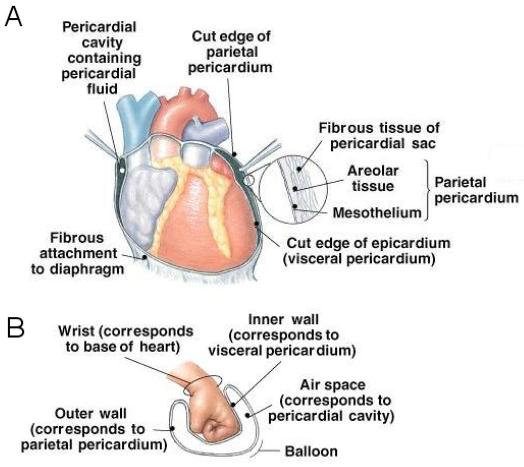
that serves to protect the heart from developing a friction rub. It is important to understand that the heart is not contained in the
pericardial cavity but, rather, invaginated into the pericardial sac, similar to pushing one's fist into a balloon (see illustration).
Thus, a visceral portion of the pericardium adheres directly to the heart while a parietal portion lines the walls of the pericardial sac,
opposite the pericardial cavity from the heart (this configuration should sound familiar to you as you recall the peritoneum).
The parietal portion of the pericardium is double-layered. The outer layer is fibrous and serves to prevent rapid overfilling of the heart. This is referred to as the fibrous pericardium. Note that the fibrous pericardium has no visceral component, i.e., it is parietal by definition. The inner layer is serous and provides a smooth surface across the pericardial cavity from the moving heart, minimizing friction. This is referred to as the parietal serous pericardium. Note that the fibrous pericardium and the parietal serous pericardium are bound together and cannot be separated.
Dissection Overview: Middle Mediastinum
The middle mediastinum contains the pericardium, the heart, and the roots of the great vessels. The great vessels of the heart
(ascending aorta, pulmonary trunk, superior vena cava, inferior vena cava, and four pulmonary veins) emerge where the pericardium reflects
off the heart and vessels to form the parietal serous pericardium. Because the pericardium is attached to the central tendon of the diaphragm,
the heart moves with the diaphragm during inspiration and expiration.
The order of dissection will be as follows: The pericardium will be opened and its relationship to the heart and great vessels will be explored. The characteristics of the parietal serous pericardium will then be studied.
Dissection Instructions: The Heart in Situ
- Observe that the outer surface of the pericardial sac consists of rough, dull tissue. This is the fibrous pericardium.
- Observe that the mediastinal parietal pleura is in contact with the fibrous pericardium and root of the lung.
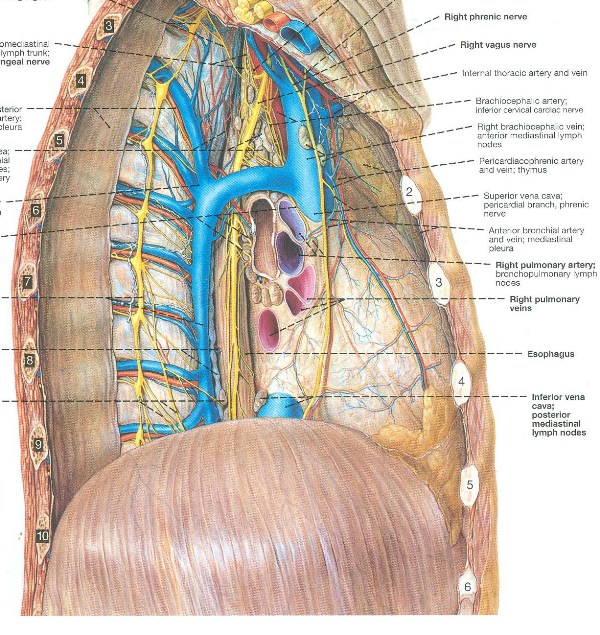
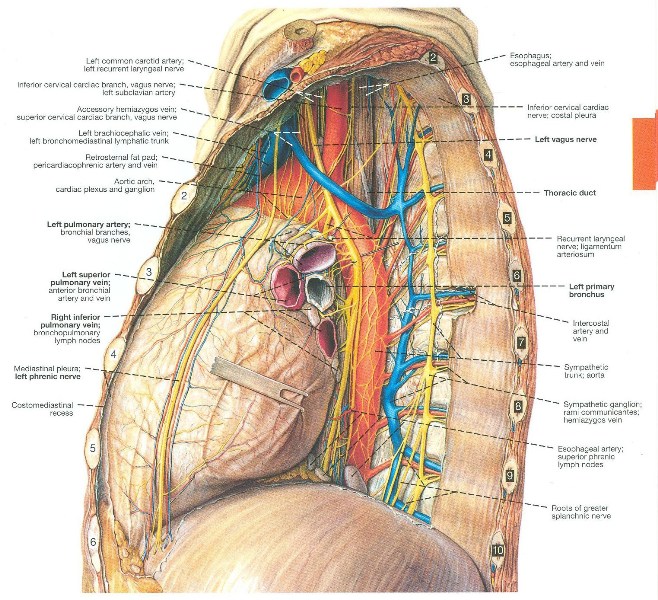
- Visually inspect and palpate the mediastinal parietal pleura. On each side, you should see a white line through the mediastinal parietal pleura, passing anterior to the root of the lung. These are the left and right phrenic nerves.
- Using the open-scissor technique or a probe, bluntly dissect the mediastinal parietal pleura along the course of the phrenic nerves, exposing them. (See figures to the right showing lateral views of the right and left sides of the middle mediastinum. In these figures, the mediastinal pleura has been removed). The phrenic nerves are located between the mediastinal parietal pleura and the fibrous pericardium about 1.5 cm anterior to the root of the lung. Follow the phrenic nerve to the diaphragm. Each phrenic nerve (right or left) is the only motor innervation to that half of the diaphragm.
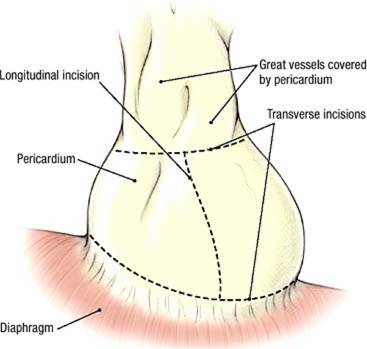
- Open the pericardium in the following manner. Use forceps to elevate the anterior surface of the pericardium. Use scissors to make a longitudinal incision from the diaphragm to the aorta. Taking care to protect the phrenic nerves, make the transverse incisions illustrated and open the flaps widely. If necessary, detach the phrenic nerves from the fibrous pericardium prior to making the transverse incisions.
- Observe that the inner surface of the flaps is lined by smooth, shiny tissue. This is the parietal serous pericardium.
- Observe that the outer surface of the heart is characterized by the same smooth, shiny tissue. This is the visceral serous pericardium. Rub the flaps against the heart and appreciate how little friction exists between the heart and the parietal pericardium.
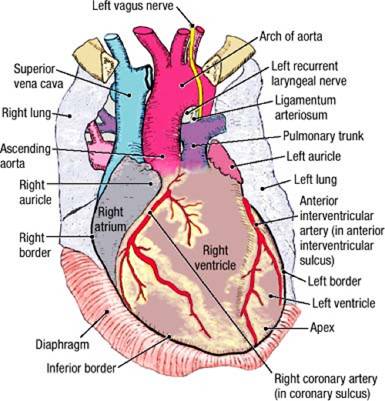
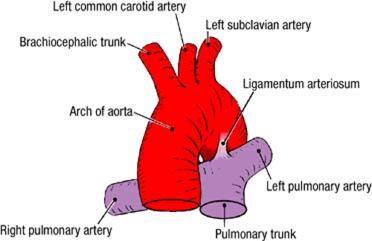
- Identify the following structures: superior vena cava, inferior vena cava, ascending aorta, arch of the aorta (aortic arch), and pulmonary trunk.
- Use your fingers to gently open the interval between the concavity of the aortic arch and pulmonary trunk, and identify the ligamentum arteriosum. The ligamentum arteriosum connects the left pulmonary artery to the arch of the aorta.
- Use a probe to dissect the left vagus nerve where it crosses the left side of the aortic arch. Identify the initial portion of the left recurrent laryngeal nerve. The left recurrent laryngeal nerve is located inferior to the aortic arch and posterior to the ligamentum arteriosum.
- Examine the heart and identify the chambers that can be seen from the anterior view: right atrium, right ventricle, and left ventricle. Note that the right ventricle forms most of the anterior surface of the heart.
- Identify the borders of the heart:
- Right border - formed by the right atrium
- Inferior border - formed by the right ventricle and a small part of the left ventricle
- Left border - formed by the left ventricle
- Superior border - formed by the right and left atria and auricles
- Identify the apex of the heart. Note that the apex of the heart is part of the left ventricle. The apex of the heart is normally located deep to the left fifth intercostal space, approximately 9 cm from the midline.
- Identify the anatomical base of the heart, which consists primarily of the left atrium. Clinicians often refer to the emergence of the great vessels from the heart as its base.
- The pericardial cavity is a potential space between the parietal and visceral serous pericardium. Normally it contains only a thin film of serous fluid that lubricates the serous surfaces and allows free movement of the heart within the pericardium.
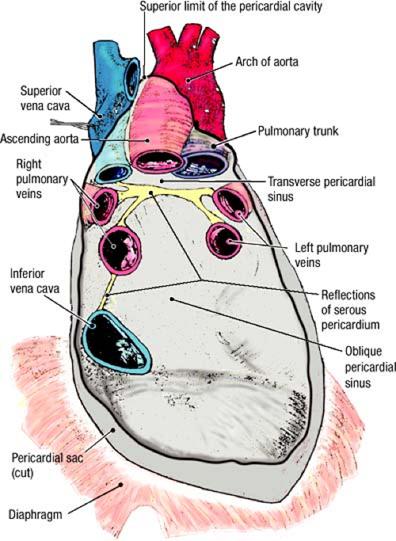
- Place your right hand in the pericardial cavity with your fingers posterior to the heart. Lift the heart gently and push your fingers superiorly until they are stopped by the reflection of serous pericardium. Your fingertips are located in the oblique pericardial sinus (See figure depicting the inner surface of the posterior wall of the middle mediastinum showing the pericardial sinuses and serous reflections. This illustration shows the view that will be seen once the heart has been removed). Remove your hand from the oblique pericardial sinus.
- In the transverse plane, push your right index finger posterior to the pulmonary trunk and ascending aorta. Proceed from left to right until your fingertip emerges between the superior vena cava and the aortic arch. Your finger is in the transverse pericardial sinus. The transverse pericardial sinus separates the arteries (ascending aorta and pulmonary trunk) anteriorly from the veins (superior vena cava, pulmonary veins, inferior vena cava) posteriorly.
- Anterior to the aorta, gently insert the tip of a probe between the parietal pericardium and the ascending aorta. Slowly advance the probe superiorly until it stops. This is the superior limit of the pericardial cavity.
- Use your fingers to explore the lines of reflection of the serous pericardium where the great vessels (ascending aorta, pulmonary trunk, superior vena cava, inferior vena cava, and four pulmonary veins) enter and exit the heart.
- Replace the anterior thoracic wall into its correct anatomical position. Use the cadaver and an illustration to project the outline of the heart to the surface of the thoracic wall.
IN THE CLINIC: Pericardium
Inflammatory diseases can cause fluid to accumulate in the pericardial cavity (pericardial effusion). Bleeding into the pericardial cavity (hemopericardium) may result from penetrating heart wounds or perforation of a weakened heart muscle following myocardial infarction. Because the pericardium is composed of fibrous connective tissue, it cannot stretch, and fluids collected in the pericardial cavity compress the heart (cardiac tamponade).
Inflammatory diseases can cause fluid to accumulate in the pericardial cavity (pericardial effusion). Bleeding into the pericardial cavity (hemopericardium) may result from penetrating heart wounds or perforation of a weakened heart muscle following myocardial infarction. Because the pericardium is composed of fibrous connective tissue, it cannot stretch, and fluids collected in the pericardial cavity compress the heart (cardiac tamponade).
Prosection: External Features of the Heart
You will dissect away the epicardium to reveal cardiac veins, the coronary arteries and their branches. Your instructors will make available
containers of prosected hearts that you can use to increase the "hands on" opportunity of this dissection sequence. Take a few minutes now
to familiarize yourself with these structures prior to dissecting them in your cadaver. Make sure that these prosected hearts are returned
to the buckets at the end of your lab session.
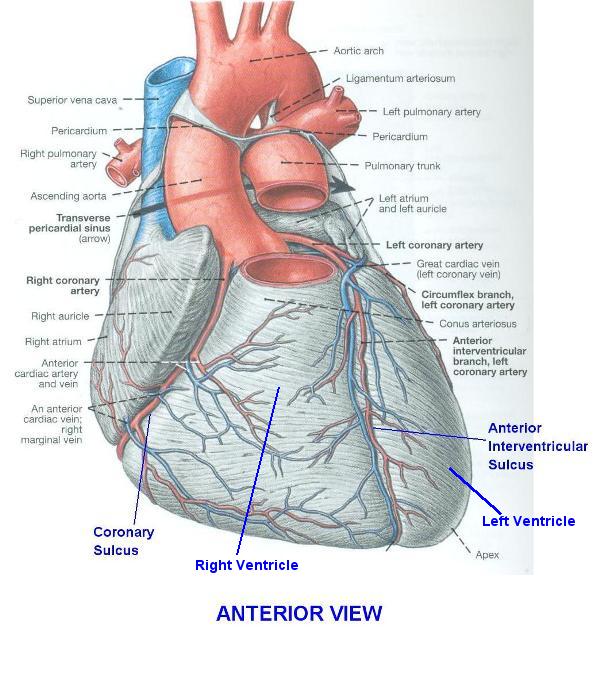
- Examine the external surface of the heart. Identify the following:
- Coronary (atrioventricular) sulcus (L. sulcus, a groove; pl. sulci) - it runs around the heart, separating the atria from the ventricles.
- Anterior interventricular sulcus and posterior interventricular sulcus - the interventricular sulci indicate the location of the interventricular septum that separates the left and right ventricles. The interventricular sulci join the coronary sulcus at a right angle.
- Identify the surfaces of the heart:
- Sternocostal (anterior) surface - formed mainly by the right ventricle.
- Diaphragmatic (inferior) surface - formed mainly by the left ventricle and a small part of the right ventricle.
- Pulmonary (left) surface - formed mainly by the left ventricle. The pulmonary surface of the heart is in contact with the cardiac impression of the left lung.
- Note that the coronary sulcus and the interventricular sulci mark the boundaries of the four chambers of the heart.
- On the surface of the heart, identify the chambers
- Right atrium and right auricle
- Right ventricle
- Left ventricle
- Left atrium and left auricle
- Examine a prosected heart in superior view. Identify:
- Ascending aorta and aortic valve
- Pulmonary trunk and pulmonary valve
- Superior vena cava
- Using a prosected heart, examine the diaphragmatic surface of the heart and identify:
- Inferior vena cava
- Posterior interventricular sulcus
The Heart in Situ and the Sternocostal Surface
Dissection of the heart will proceed in four stages. The external features on the anterior aspect of the heart will be studied in situ,
including its vascular supply. The heart will then be removed during the next laboratory session. The external features on the posterior
aspect (pulmonary and diaphragmatic surfaces) will be studied. The internal features of each chamber of the heart will then be studied. As you
perform this dissection, use a prosected heart as a guide.
Dissection Instructions: Cardiac Veins
- The heart has three histological layers
- an inner endocardium, which includes the inner epithelial lining in contact with blood and an underlying layer of connective tissue
- the myocardium, largely composed of cardiac muscle
- the outer epicardium, which consists of:
- an outer epithelial layer, the visceral serous pericardium
- epicardial fat, an underlying layer of adipose (fat) in which the cardiac veins and coronary arteries are located.
- The cardiac veins course superficial to the coronary arteries, so they will be dissected first.
- Use blunt dissection to pierce and remove the smooth visceral serous pericardium to expose the underlying epicardial fat (See figure). The cardiac veins are particularly vulnerable to being damaged during the dissection process because they have thin walls that may not be immediately distinguishable from overlying epicardial fat. Carefully clear away the fat to find the cardiac veins and coronary vessels.
- Use blunt dissection to follow the great cardiac vein on the sternocostal surface of the heart. The great cardiac vein courses in the anterior interventricular sulcus from the apex of the heart toward the coronary sinus.
- Attempt to find the anterior cardiac veins, which bridge the coronary sulcus between the right ventricle and right atrium. The anterior cardiac veins are sometimes difficult to find. Study another team's heart if you have trouble finding them. The anterior cardiac veins drain the anterior wall of the right ventricle directly into the right atrium. Anterior cardiac veins pass superficial to the right coronary artery.

- Use blunt dissection to clean the left coronary artery. The left coronary artery is quite short. In the coronary sulcus, the left coronary artery divides into the anterior interventricular branch of the left coronary artery and the circumflex branch of the left coronary artery.
- Trace the anterior interventricular branch of the left coronary artery in the anterior interventricular sulcus to the apex of the heart (clinicians often call the anterior interventricular branch of the left coronary artery the left anterior descending (LAD) artery). Note that the anterior interventricular branch of the left coronary artery accompanies the great cardiac vein.
- Follow the circumflex branch of the left coronary artery in the coronary sulcus to the left border of the heart. The circumflex branch of the left coronary artery has several unnamed branches that supply the posterior wall of the left ventricle.
- Use blunt dissection to clean the right coronary artery and identify the anterior right atrial branch of the right coronary artery. The anterior right atrial branch of the right coronary artery arises close to the origin of the right coronary artery and ascends along the anterior wall of the right atrium toward the superior vena cava. The anterior right atrial branch of the right coronary artery gives rise to the sinuatrial nodal branch, which supplies the sinuatrial node. Do not attempt to find the sinuatrial nodal branch. It may be difficult to find due to its size.
- Follow the right coronary artery in the coronary sulcus. Preserve the anterior cardiac veins. The marginal branch of the right coronary artery usually arises near the inferior border of the heart.
Dissection Review:
- Review the parts of the mediastinum and state their boundaries.
- Review the attachments of the pericardium to the diaphragm and to the roots of the great vessels.
- Review the transverse and oblique pericardial sinuses, and the reflections of the serous pericardium.
- Compare the appearance and functional properties of the parietal serous pericardium to those of the parietal pleura.
- Review the borders of the heart.
- On the surface of the heart, review the boundaries of the four chambers.
- Review the coronary sulcus and interventricular sulci of the heart and the vessels that course within these sulci.
DISSECTION ASSIGNMENT: THE SUPERIOR MEDIASTINUM, REMOVAL OF THE HEART, AND THE INTERNAL ANATOMY
OF THE HEART
Learning Objectives:
- Relate the anatomy of the heart to its basic physiological function.
- Describe the major vascular and neural elements located in the superior mediastinum.
- Identify structures found in each of the four chambers of the heart and consider their significance.
- Compare and contrast the anatomical characteristics of the right and left sides of the heart.
- Identify the arterial blood supply and venous drainage of the heart.
- Describe the anatomy of the electrical conduction system of the heart.
- Describe the sternocostal projections of the valves of the heart and identify their auscultation points.
- Identify the contents of the superior mediastinum.
- Identify and trace the tributaries to each of the brachiocephalic veins and the formation of the superior vena cava.
- Identify and trace all the branches of the arch of the aorta in the region and the relationship of the vagus and phrenic nerves to them.
Review of the Pericardium, Great Vessels, and Pericardial Sinues in Situ
Instructions:
- Read "Overview of the Mediastinum" and "Overview of the Pericardium", if you haven't already.
- The pericardial sac was opened during the previous lab session. Place the folds of the pericardial sac back into their anatomical positions, covering the heart. Observe that the outer surface of the pericardial sac consists of rough, dull tissue. This is the fibrous pericardium.
- Observe that the inner surface of the flaps is lined by smooth, shiny tissue. This is the parietal serous pericardium. The visceral serous pericardium, along with the underlying epicardial fat, has been removed from the anterior aspect of the heart but you will see these features on the posterior aspect after you remove the heart (you can see the visceral serous pericardium now if you lift the heart gently).
- Identify the following structures: superior vena cava, inferior vena cava, ascending aorta, arch of the aorta (aortic arch), and pulmonary trunk (See figure).
- Use your fingers to gently open the interval between the concavity of the aortic arch and pulmonary trunk, and identify the ligamentum arteriosum. The ligamentum arteriosum connects the left pulmonary artery to the arch of the aorta.
- Examine the heart and identify the chambers that can be seen from the anterior view: right atrium, right ventricle, and left ventricle. Note that the right ventricle forms most of the anterior surface of the heart.
- Identify the borders of the heart:
- Right border - formed by the right atrium
- Inferior border - formed by the right ventricle and a small part of the left ventricle
- Left border - formed by the left ventricle
- Superior border - formed by the right and left atria and auricles
- Identify the apex of the heart. Note that the apex of the heart is part of the left ventricle. The apex of the heart is normally located deep to the left fifth intercostal space, approximately 9 cm from the midline.
- Identify the anatomical base of the heart, which consists primarily of the left atrium. Clinicians often refer to the emergence of the great vessels from the heart as its base.
- Place your right hand in the pericardial cavity with your fingers posterior to the heart. Lift the heart gently and push your fingers superiorly until they are stopped by the reflection of serous pericardium. Your fingertips are located in the oblique pericardial sinus (See figure depicting the inner surface of the posterior wall of the middle mediastinum showing the pericardial sinuses and serous reflections. This illustration shows the view that will be seen once the heart has been removed). Remove your hand from the oblique pericardial sinus.
- In the transverse plane, push your right index finger posterior to the pulmonary trunk and ascending aorta. Proceed from left to right until your fingertip emerges between the superior vena cava and the aortic arch. Your finger is in the transverse pericardial sinus.
- Insert the tip of a probe between the parietal pericardium and the ascending aorta. Slowly advance the probe superiorly until it stops. This is the superior limit of the pericardial cavity.
- Use your fingers to explore the lines of reflection of the serous pericardium where the great vessels (ascending aorta, pulmonary trunk, superior vena cava, inferior vena cava, and four pulmonary veins) enter and exit the heart.
- Replace the anterior thoracic wall into its correct anatomical position. Use the cadaver and an illustration to project the outline of the heart to the surface of the thoracic wall.
IN THE CLINIC: Pericardium
Inflammatory diseases can cause fluid to accumulate in the pericardial cavity (pericardial effusion). Bleeding into the pericardial cavity (hemopericardium) may result from penetrating heart wounds or perforation of a weakened heart muscle following myocardial infarction. Because the pericardium is composed of fibrous connective tissue, it cannot stretch, and fluids collected in the pericardial cavity compress the heart (cardiac tamponade).
Inflammatory diseases can cause fluid to accumulate in the pericardial cavity (pericardial effusion). Bleeding into the pericardial cavity (hemopericardium) may result from penetrating heart wounds or perforation of a weakened heart muscle following myocardial infarction. Because the pericardium is composed of fibrous connective tissue, it cannot stretch, and fluids collected in the pericardial cavity compress the heart (cardiac tamponade).
Dissection Overview: The Superior Mediastinum
The superior mediastinum contains structures that pass between the thorax and the neck, or the thorax and the upper limb. These structures
include several of the great vessels and their primary branches, the trachea, the esophagus, and the thoracic duct.
The order of dissection will be as follows: The brachiocephalic veins will be studied and reflected superiorly to expose the aortic arch. The aortic arch and its branches will be dissected. Note that only the proximal ends of some of the large vessels will be seen in this dissection. The distal parts of these vessels have been dissected with the neck during the Brain, Mind, and Behavior Block.
Dissection Instructions The Superior Mediastinum
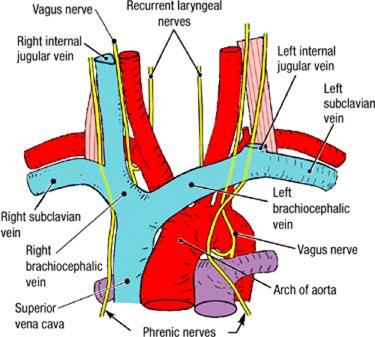
- Study the boundaries of the superior mediastinum (See figure).
- Superior - superior thoracic aperture
- Posterior - bodies of vertebrae T1 to T4
- Anterior - manubrium of the sternum
- Lateral - mediastinal pleurae (left and right)
- Inferior - horizontal plane passing through the sternal angle and T4/T5 intervertebral disk.
- Note that, for this dissection, you will be working in the area posterior to the remaining portion of the manubrium. If necessary, lift the manubrium to gain a better view of structures you are dissecting. To make the manubrium more movable, you may wish to divide the manubrium in the midline using an electric surgical saw from the blue bins (this may have already been done); be careful not to cut too deep.
- Identify the thymus. In the adult, the thymus is a fatty remnant that lies immediately posterior to the manubrium of the sternum. In most cases, it will be difficult to definitively identify the fatty thymus from the surrounding connective tissue and fat.
- Remove the remnant of the thymus by blunt dissection.
- Trace the superior vena cava superiorly until it bifurcates. Identify the left brachiocephalic vein. Use blunt dissection to clean the anterior surface of the left brachiocephalic vein and to free it from the structures that lie posterior to it.
- Identify the right brachiocephalic vein. The two brachiocephalic veins (occasionally referred to as the innominate veins by clinicians) meet to form the superior vena cava posterior to the inferior border of the right first costal cartilage.
- Follow the superior vena cava inferiorly to where it enters the right atrium. Note that the superior vena cava passes anterior to the root of the right lung.
- Cut the left brachiocephalic vein as it crosses anterior to the great vessels. Reflect the brachiocephalic veins laterally to dissect the branches of the arch of the aorta.
- Identify the right phrenic nerve and the left phrenic nerve that pass posterior to the brachiocephalic veins. The phrenic nerves were previously dissected in the middle mediastinum. Note that the right and left phrenic nerves pass anterior to the roots of the right and left lungs, respectively. Demonstrate that the phrenic nerves enter the superior surface of the diaphragm.
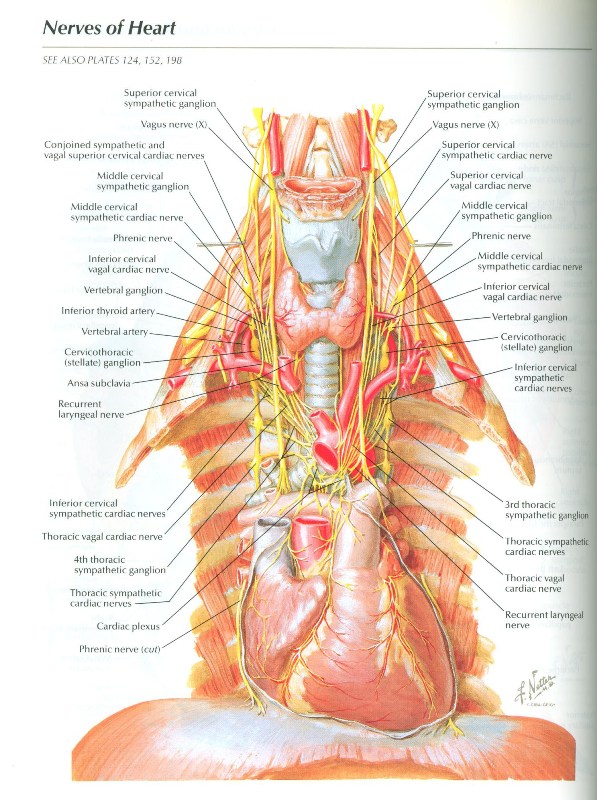
- Identify the arch of the aorta. The arch of the aorta begins and ends at the level of the sternal angle. Locate the superficial part of the cardiac plexus lying inferior to the aortic arch. It is formed by cardiac branches from the sympathetic trunk and the vagus nerve. Note that the deep part of the cardiac plexus lies anterior to the tracheal bifurcation and will be dissected later.
- Identify the three arteries that arise from the arch of the aorta. From anterior to posterior these arteries are:
- Brachiocephalic trunk
- Left common carotid artery
- Left subclavian artery
- Identify the ligamentum arteriosum. The ligamentum arteriosum is a fibrous cord that connects the concavity of the arch of the aorta to the left pulmonary artery.
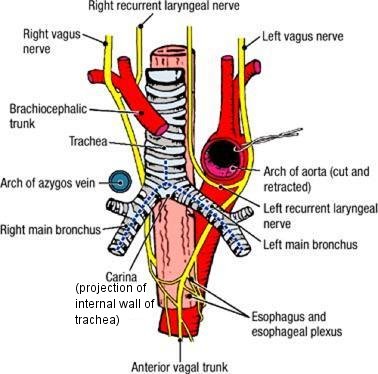
- Identify the left vagus nerve and the left recurrent laryngeal nerve on the left side of the arch of the aorta. The left recurrent laryngeal nerve loops around, inferior to the arch of the aorta and posterior to the ligamentum arteriosum. Follow the left vagus nerve inferiorly and note that it passes posterior to the root of the left lung toward the esophagus (See figure).
- On the right side, identify the right vagus nerve as it passes posterior to the root of the right lung (See figure). The right recurrent laryngeal nerve (a branch of the right vagus nerve) loops around the right subclavian artery, and has been seen when the root of the neck was dissected during the Brain, Mind, and Behavior Block.
IN THE CLINIC: Thymus
In the newborn, the thymus is an active lymphatic organ that can be visualized on a chest radiograph. The thymus is replaced by connective tissue and fat after puberty. It may be difficult to recognize the thymus in the cadaver.
In the newborn, the thymus is an active lymphatic organ that can be visualized on a chest radiograph. The thymus is replaced by connective tissue and fat after puberty. It may be difficult to recognize the thymus in the cadaver.
IN THE CLINIC: Left Recurrent Laryngeal Nerve
The left recurrent laryngeal nerve has a close relationship to the aortic arch and passes through the superior mediastinum. In cases of mediastinal tumors or an aneurysm of the aortic arch, the left recurrent laryngeal nerve may be compressed, resulting in paralysis of the left vocal fold and hoarseness.
The left recurrent laryngeal nerve has a close relationship to the aortic arch and passes through the superior mediastinum. In cases of mediastinal tumors or an aneurysm of the aortic arch, the left recurrent laryngeal nerve may be compressed, resulting in paralysis of the left vocal fold and hoarseness.
Dissection Review
- Replace the contents of the superior mediastinum into their correct anatomical positions.
- Return the anterior thoracic wall to its correct anatomical position. Project the structures of the superior mediastinum to the surface of the thoracic wall.
- Remove the anterior thoracic wall.
- Review the position of the ascending aorta and the position of the arch of the aorta.
- Review the branches of the arch of the aorta.
- Compare the positions of the phrenic and vagus nerves to the root of the lung.
- Contrast the thoracic course of the left recurrent laryngeal nerve to the thoracic course of the right recurrent laryngeal nerve. Relate this difference to the embryonic origin of the arteries.
Dissection Overview: Removal of the Heart
Dissection of the heart will proceed in four stages. The external features on the anterior aspect of the heart were dissected in situ
during the previous laboratory session. The heart will now be removed by cutting the great vessels. Following removal of the heart, the
external features on the pulmonary and diaphragmatic surfaces of the heart will be studied. Finally, the internal features of each chamber of
the heart will be studied.
Dissection Instructions: Removal of the Heart
- Refer to figure. This figure shows the inner surface of the posterior wall of the pericardium showing pericardial sinuses and serous reflections after the heart has been removed. The reflections of the serious pericardium are indicated in yellow.
- The heart will be detached from the great vessels along the lines of reflection of the serous pericardium.
- Place a probe through the transverse pericardial sinus.
- Use scissors to cut the ascending aorta and the pulmonary trunk anterior to the probe, about 1.5 cm superior to the point where the aorta and pulmonary trunk emerge from the heart.
- Use scissors to cut the superior vena cava about 1 cm superior to its junction with the right atrium.
- Lift the apex of the heart superiorly and cut the inferior vena cava close to the surface of the diaphragm.
- While lifting the apex of the heart, cut the four pulmonary veins where they form the boundary of the oblique pericardial sinus. Cut the pulmonary veins very close to the inner surface of the pericardial sac.
- The heart is now held in place only by reflections of serous pericardium from its posterior surface to the inner surface of the pericardial sac. Cut these reflections and remove the heart.
- Examine the posterior wall of the pericardium and identify the openings of eight vessels and the lines of the pericardial reflections.
Dissection Review:
- Review the parts of the mediastinum and state their boundaries.
- Review the attachments of the pericardium to the diaphragm and to the roots of the great vessels.
- Review the embryonic origin of the transverse and oblique pericardial sinuses.
External Features of the Pulmonary and Diaphragmatic Surfaces of the Heart
Your instructors will make available containers of prosected hearts that you can use to increase the "hands on" opportunity of this dissection
sequence. Take a few minutes now to familiarize yourself with these structures prior to dissecting the vasculature on the pulmonary and
diaphragmatic surfaces.
Click Prosection: External Heart. Proceed through this exercise to familize yourself with features on the external surface of the heart prior to performing your dissection assignment. Then return here to dissect the pulmonary and diaphragmatic surfaces of your heart. Use the prosected heart as a guide in performing your dissection but make sure that these prosected hearts are returned to the buckets at the end of your lab session.
Cardiac Veins
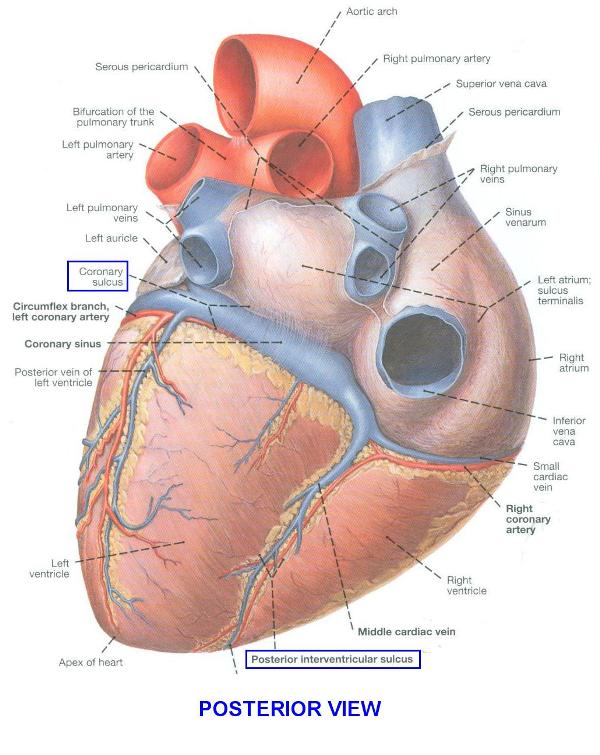
- Refer to POSTERIOR VIEW OF THE HEART and ANTERIOR VIEW OF THE HEART to aid you in performing this dissection.
- The heart has three histological layers
- an inner endocardium, which includes the inner epithelial lining in contact with blood and an underlying layer of connective tissue
- the myocardium, largely composed of cardiac muscle
- the outer epicardium, which consists of:
- an outer epithelial layer, the visceral layer of serous pericardium
- epicardial fat, an underlying layer of adipose (fat) in which the cardiac veins and coronary arteries are located.
- During the previous laboratory session, blunt dissection was used to remove the visceral serous pericardium from the sterncostal surface to expose the underlying epicardial fat. The epicardial fat was cleared away to find the cardiac veins and coronary vessels.
- Use blunt dissection to pierce and remove the visceral serous pericardium from the pulmonary and diaphragmatic surfaces. Note that the coronary sinus and the cardiac veins are particularly vulnerable to being damaged during the dissection process because they have thin walls that may not be immediately distinguishable from overlying epicardial fat. Clear away the fat to find the coronary sinus, cardiac veins and coronary vessels. The coronary sinus and cardiac veins course superficial to the coronary arteries, so they will be dissected first.
- Identify the coronary sinus on the diaphragmatic surface of the heart (POSTERIOR VIEW OF THE HEART). The coronary sinus is a dilated portion of the venous system of the heart that is located in the coronary sulcus. The coronary sinus is about 2 to 2.5 cm in length and opens into the right atrium. Its opening will be seen when the internal features of the right atrium are dissected.
- Use a probe to clean the surface of the coronary sinus (POSTERIOR VIEW OF THE HEART). Note that the wall of the coronary sinus is very thin and easily torn.
- Follow the coronary sinus in the coronary sulcus to the point where it receives the great cardiac vein (ANTERIOR VIEW OF THE HEART) on the sternocostal surface of the heart. The great cardiac vein courses in the anterior interventricular sulcus from the apex of the heart toward the coronary sinus.
- In the posterior interventricular sulcus, identify the middle cardiac vein and trace it to the coronary sinus (POSTERIOR VIEW OF THE HEART).
- Near the inferior end of the coronary sinus, identify the small cardiac vein (POSTERIOR VIEW OF THE HEART). Use a probe to dissect the small cardiac vein and follow it to the anterior surface of the heart where it courses along the inferior border of the heart.
- The anterior cardiac veins (ANTERIOR VIEW OF THE HEART) have already been dissected during the previous lab session. Note that most veins of the heart are tributaries to the coronary sinus, whereas the anterior cardiac veins are the exceptions to this rule.
Coronary Arteries
- Refer to the following figures to aid you in performing this dissection:
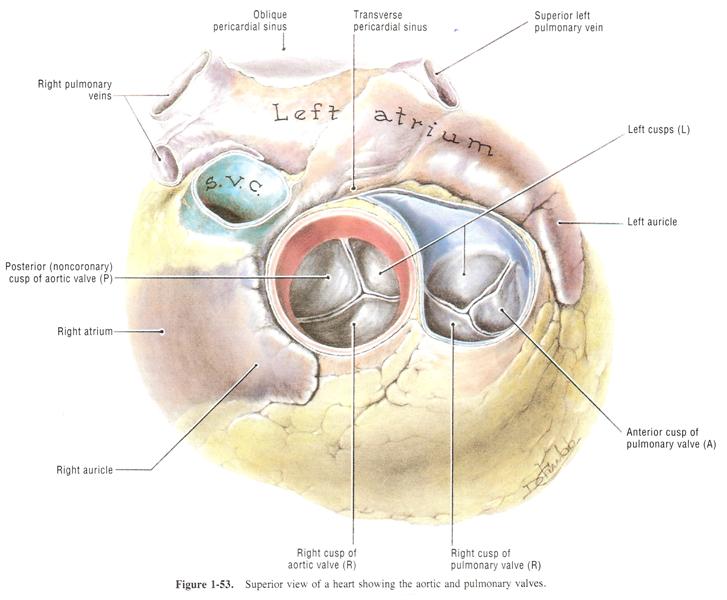
AORTIC AND PULMONARY VALVES,
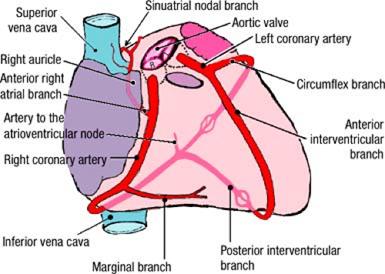
CORONARY ARTERIES - ANTERIOR VIEW,
POSTERIOR VIEW OF THE HEART, and
CORONARY ARTERIES AND THEIR BRANCHES - Observe the aortic valve in the lumen of the ascending aorta (AORTIC AND PULMONARY VALVES). Identify the right, left, and posterior semilunar cusps of the aortic valve. Between each valve cusp and the wall of the aorta is a small pocket called an aortic sinus (right, left, and posterior, respectively).
- In the left aortic sinus, identify the opening of the left coronary artery. Insert the tip of a probe into the opening. On the surface of the heart, palpate the tip of the probe between the left auricle and the pulmonary trunk. This is the initial portion of the left coronary artery. The left coronary artery is quite short. In the coronary sulcus, the left coronary artery divides into the anterior interventricular branch of the left coronary artery and the circumflex branch of the left coronary artery (CORONARY ARTERIES - ANTERIOR VIEW).
- Follow the circumflex branch of the left coronary artery in the coronary sulcus and around the left border of the heart (POSTERIOR VIEW OF THE HEART). The circumflex branch of the left coronary artery has several unnamed branches that supply the posterior wall of the left ventricle. The circumflex branch of the left coronary artery accompanies the coronary sinus in the coronary sulcus.
- The anterior interventricular branch of the left coronary artery artery (CORONARY ARTERIES - ANTERIOR VIEW) has already been dissected during the previous lab session. Trace the anterior interventricular branch of the left coronary artery in the anterior interventricular sulcus to the apex of the heart (clinicians often call the anterior interventricular branch of the left coronary artery the left anterior descending (LAD) artery). Note that the anterior interventricular branch of the left coronary artery accompanies the great cardiac vein.
- In the right aortic sinus, identify the opening of the right coronary artery (AORTIC AND PULMONARY VALVES). Insert the tip of a probe into its opening. On the surface of the heart, palpate the tip of the probe in the coronary sulcus between the right auricle and the ascending aorta. This is the beginning of the right coronary artery (CORONARY ARTERIES - ANTERIOR VIEW).
- Identify the anterior right atrial branch of the right coronary artery (CORONARY ARTERIES AND THEIR BRANCHES). The anterior right atrial branch of the right coronary artery arises close to the origin of the right coronary artery and ascends along the anterior wall of the right atrium toward the superior vena cava. The anterior right atrial branch of the right coronary artery gives rise to the sinuatrial nodal branch, which supplies the sinuatrial node. Do not attempt to find the sinuatrial nodal branch. It may be difficult to find due to its size.
- Follow the right coronary artery in the coronary sulcus. Preserve the anterior cardiac veins. The marginal branch of the right coronary artery usually arises near the inferior border of the heart (CORONARY ARTERIES - ANTERIOR VIEW). The marginal branch of the right coronary artery accompanies the small cardiac vein along the inferior border of the heart.
- Continue to follow the right coronary artery in the coronary sulcus onto the diaphragmatic surface of the heart (POSTERIOR VIEW OF THE HEART). When the right coronary artery reaches the posterior interventricular sulcus, it gives rise to the posterior interventricular branch of the right coronary artery (note that the posterior interventricular branch may arise from the left coronary artery in some cases - see IN THE CLINIC box below). The posterior interventricular branch of the right coronary artery courses along the posterior interventricular sulcus to the apex of the heart, where it anastomoses with the anterior interventricular branch of the left coronary artery. The posterior interventricular branch of the right coronary artery accompanies the middle cardiac vein.
- Note that the artery to the atrioventricular node arises from the right coronary artery at the point where the posterior interventricular sulcus meets the coronary sulcus (CORONARY ARTERIES AND THEIR BRANCHES). Do not attempt to find this vessel.
IN THE CLINIC: Coronary Arteries
In approximately 75% of hearts, the right coronary artery gives rise to the posterior interventricular branch and supplies the left ventricular wall and posterior portion of the interventricular septum (this configuration is referred to as "right dominance"). In approximately 15% of hearts, the left coronary artery gives rise to the posterior interventricular branch ("left dominance"). Other variations account for 10%.
In approximately 75% of hearts, the right coronary artery gives rise to the posterior interventricular branch and supplies the left ventricular wall and posterior portion of the interventricular septum (this configuration is referred to as "right dominance"). In approximately 15% of hearts, the left coronary artery gives rise to the posterior interventricular branch ("left dominance"). Other variations account for 10%.
Dissection Review:
- Review the borders of the heart.
- On the surface of the heart, review the boundaries of the four chambers.
- Review the coronary sulcus and interventricular sulci of the heart and the vessels that course within these sulci.
- Trace one possible pathway for a drop of blood from the right aortic sinus to the coronary sinus, naming all vessels that are involved.
- Trace one possible pathway for a drop of blood from the left aortic sinus to the apex of the heart and its venous return to the coronary sinus, naming all vessels that are involved.
Dissection Overview: Internal Features of the Heart
The atria and ventricles of the heart will be opened and their internal features will be studied. The incisions that will be used are designed
to preserve most of the vessels that you have previously dissected. The heart will contain clotted blood, which must be removed. The clots will
be hard and may need to be broken before they can be extracted. The chambers will be dissected in the sequence that blood passes through the
heart: right atrium, right ventricle, left atrium, and left ventricle. All descriptions are based on the heart in anatomical position.
Dissection Instructions: Right Atrium
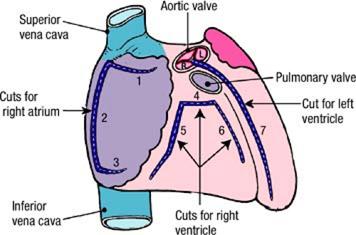
The cuts used to open the right atrium are illustrated:
- Use scissors to make a cut through the tip of the right auricle. Insert one blade of the scissors through the opening and make a short horizontal cut toward the right (cut 1).
- Turn the scissors and cut through the anterior wall of the right atrium in an inferior direction. Stop superior to the inferior vena cava (cut 2).
- Make a horizontal cut toward the left, stopping just short of the coronary sulcus (cut 3).
- Turn the flap of the atrial wall toward the left and open the right atrium widely. Remove blood clots and take the heart to the sink to rinse it with water.
- Observe the inner surface of the anterior wall of the right atrium. Identify:
- Pectinate muscles - horizontal ridges of muscle
- Crista terminalis - a vertical ridge of muscle that connects the pectinate muscles
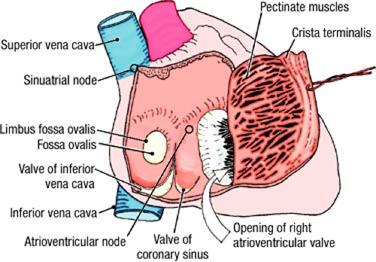
- Observe that, unlike the anterior wall, the posterior wall of the right atrium is smooth. Identify:
- Opening of the superior vena cava
- Opening and valve of the inferior vena cava
- Opening and valve of the coronary sinus
- Fossa ovalis
- Parts of the conducting system of the heart are located in the walls of the right atrium, but cannot be seen in dissection. Familiarize yourself with their approximate locations. The sinuatrial node (SA node) lies at the superior end of the crista terminalis at the junction between the right atrium and the superior vena cava. The atrioventricular node (AV node) is located in the interatrial septum, above the opening of the coronary sinus.
- Identify the opening of the right atrioventricular valve, which leads into the right ventricle.
IN THE CLINIC: Fossa Ovalis
The fossa ovalis is the remnant of the foramen ovale. In fetal life, blood from the placenta is delivered to the heart by way of the inferior vena cava. This oxygen-rich and nutrient-rich blood is directed toward the foramen ovale, which allows passage into the left atrium and out to the body without passing through the lungs.
The fossa ovalis is the remnant of the foramen ovale. In fetal life, blood from the placenta is delivered to the heart by way of the inferior vena cava. This oxygen-rich and nutrient-rich blood is directed toward the foramen ovale, which allows passage into the left atrium and out to the body without passing through the lungs.
Dissection Instructions: Right Ventricle
The cuts used to open the right ventricle are illustrated:
- Insert your finger into the pulmonary trunk and determine the level of the pulmonary valve. Immediately inferior to the level of the pulmonary valve, use scissors to make a short horizontal cut through the anterior wall of the right ventricle (cut 4).
- Insert one blade of the scissors into the right end of the cut 4 and make a cut parallel to the coronary sulcus (cut 5). This cut should be about 1 cm from the coronary sulcus and end at the inferior border of the heart. Cut only the ventricular wall, not the atrioventricular valve cusp.
- Insert your finger through the opening in the ventricular wall and palpate the interventricular septum. From the left end of cut 4, make a cut toward the inferior border of the heart (cut 6). This cut should be about 2 cm to the right of the anterior interventricular sulcus and should parallel the right side of the interventricular septum.
- Turn the flap of the right ventricular wall inferiorly.
- Remove blood clots. Use care to avoid damaging the chordae tendineae. Rinse the right ventricle with water.
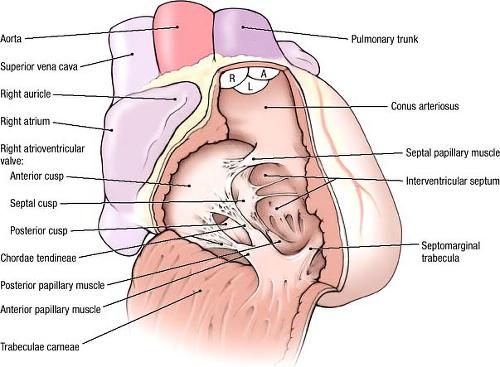
- Identify the opening of the right atrioventricular valve. Observe that the right atrioventricular valve has three cusps: anterior, septal, and posterior. The right atrioventricular valve is also called the tricuspid valve.
- Identify the chordae tendineae. Observe that these delicate tendons pass from the valve cusps to the apices of papillary muscles. The papillary muscles arise from the walls of the right ventricle.
- Identify three papillary muscles: anterior, septal, and posterior. The anterior papillary muscle is the largest. The septal papillary muscle is very small and may be multiple. Note that the chordae tendineae of each papillary muscle attach to the adjacent sides of two valve cusps.
- Observe that the inner surface of the wall of the right ventricle is roughened by muscular ridges called trabeculae carneae (L. trabs, wooden beam; carneus, fleshy).
- Identify the septomarginal trabecula (moderator band). The septomarginal trabecula extends from the interventricular septum to the base of the anterior papillary muscle. The septomarginal trabecula contains part of the right bundle of the conducting system, the part that stimulates the anterior papillary muscle.
- Identify the opening of the pulmonary trunk. The conus arteriosus (infundibulum) is the cone-shaped portion of the right ventricle inferior to the opening of the pulmonary trunk. The inner wall of the conus arteriosus is smooth.
- Observe that the pulmonary valve consists of three semilunar cusps: anterior, right, and left.
- Look into the pulmonary trunk from above and examine the superior surface of the three semilunar valve cusps. The free edge of each semilunar valve cusp has a thickened central point, called the nodule. The nodule divides the free edge of the semilunar valve cusp into two halves. Each half is refered to as a lunule. The nodule and lunules help to seal the valve cusps and prevent backflow of blood during diastole.
Dissection Instructions: Left Atrium
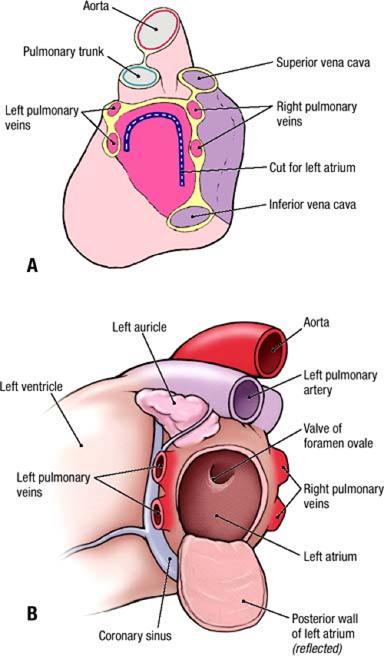
- Examine the posterior surface of the heart. Observe the openings of the four pulmonary veins into the left atrium. The pulmonary veins are usually arranged in pairs, two from the right lung and two from the left lung. If you cut too close to the left atrium when cutting the pulmonary veins on one side, you may have "connected" them, i.e. you will only have one large opening on one side instead of two smaller openings.
- The cut used to open the left atrium is illustrated
- Use scissors to make an inverted U-shaped incision through the posterior wall of the left atrium. Do not cut into the openings of the pulmonary veins; cut between them. Turn the flap inferiorly.
- Remove blood clots and rinse with water.
- Note that the inner surface of the wall of the left atrium is smooth except for its auricle, which has a rough inner surface.
- Observe the following features in the left atrium:
- Valve of the foramen ovale on the interatrial septum
- Opening into the left auricle
- Opening of the left atrioventricular valve
Dissection Instructions: Left Ventricle
- The cut used to open the left ventricle is illustrated. Note that the following procedure will cut the anterior interventricular branch of the left coronary artery and the great cardiac vein.
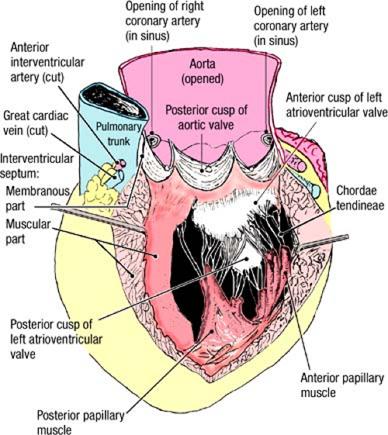
- Look into the aorta from above and identify the aortic valve. Identify three semilunar valve cusps: right, left, and posterior.
- Insert one blade of a scissors between the left and right semilunar cusps.
- Make a cut through the anterior wall of the ascending aorta between the left and right semilunar cusps (figure, cut 7). This cut should be anterior and parallel to the left coronary artery.
- Continue the cut to the apex of the heart. The cut should be about 2 cm to the left of the anterior interventricular sulcus and should be parallel to the left side of the interventricular septum. The cut will cross the anterior interventricular branch of the left coronary artery and the great cardiac vein.
- Open the left ventricle and the ascending aorta widely. Remove blood clots and rinse with water.
- In the left ventricle, identify the left atrioventricular valve (bicuspid valve, mitral valve). Identify the anterior cusp and the posterior cusp.
- Identify the anterior papillary muscle and the posterior papillary muscle. In distinguishing the two muscles from each other, remember that, to open the left ventricle, the anterior wall is being pulled to the left. Observe that the chordae tendineae of each papillary muscle attach to both valve cusps.
- Observe that the inner surface of the wall of the left ventricle is roughened by trabeculae carneae.
- Examine the aortic valve. Again identify its right, left, and posterior semilunar cusps. As is the case with the pulmonary valve, observe that each semilunar valve cusp of the aortic valve has one nodule and two lunules.
- Palpate the muscular part of the interventricular septum. Place the thumb of your right hand in the right ventricle and your index finger in the left ventricle and palpate the thickness of the muscular part of the interventricular septum.
- Move your thumb and index finger superiorly along the interventricular septum and palpate the thin membranous part of the interventricular septum. It is located inferior to the attachment of the right cusp of the aortic valve.
- In the aorta, observe the openings of the coronary arteries and study their relationship to the semilunar valve cusps and the aortic sinuses. The posterior cusp is also called the noncoronary cusp because there is no coronary artery arising from its sinus.
- Use an illustration to study the conducting system of the heart. Recall that the SA node is in the wall of the right atrium, at the superior end of the crista terminalis near the superior vena cava. Impulses from the SA node pass through the wall of the right atrium to the AV node. Impulses that originate in the AV node pass in the AV bundle through the membranous part of the interventricular septum. Subsequently, the AV bundle divides into right and left bundles, which lie on either side of the muscular part of the interventricular septum and stimulate the ventricles to contract. The right bundle is noteworthy because it carries impulses to the anterior papillary muscle through the septomarginal trabecula.

Dissection Review:
- Review the internal features of each of the chambers of the heart.
- Replace the heart into the thorax in its correct anatomical position. Return the anterior thoracic wall to its anatomical position. Use an illustration, a textbook description, and the dissected specimen to project the heart valves to the surface of the anterior thoracic wall.
- Read a description of the auscultation point used to listen to each heart valve. Locate each auscultation point on the anterior thoracic wall, and then lift the anterior thoracic wall to observe the location of the auscultation point relative to the heart.
- Review the course of blood as it passes through the heart, beginning in the superior vena cava and ending in the ascending aorta. In the correct sequence, name all of the chambers and valves that the blood passes through.
- Review the blood supply to the heart. Trace a drop of blood from the left coronary artery and the right coronary artery to the coronary sinus, naming all vessels traversed.
- Review the connections of the great vessels to the heart.
- Use an illustration to review the conducting system of the heart and relate the illustration to the dissected specimen.
FOCUS QUESTIONS (Answers)
1. Organize the innervation and blood supply of a complete intercostal space.2. Did you find any thymic nodules? What are they?
3. Define the boundaries of the superior mediastinum.
4. Observe the formation of the superior vena cava (confluence of both brachiocephalic veins), and relate its position to the manubrium and other great vessels.
5. Are there cardiac nerves arising from the left vagus?
6. Do you find a vertebral artery from the arch of the aorta?
7. Is the artery to the atrioventricular node a branch of the right, left, or both coronary arteries?
8. Define anterior cardiac and small cardiac veins.
9. Review the cardiac plexus and its distribution along the coronary vessels. (Latin, plectere = to braid)
10. Define endocardium.
11. Examine the right atrioventricular (tricuspid) valve. Define the cusps.
12. Define chamber walls: interventricular (or interatrial), anterior and posterior.
13. In the right ventricle, define papillary muscles, chordae tendineae and tricuspid valve cusps. (Latin, papilla = nipple)
14. Do you find a septomarginal trabecula? Describe what it does.
15. Name the semilunar cusps of the pulmonary valve.
16. Does the left atrioventricular (mitral, bicuspid) valve have any commissural cusps? Note relation of anterior cusp to aortic wall.
17. What is the aortic vestibule?
18. Name the semilunar cusps of the aortic valve.
19. Where are the sounds associated with each heart valve best heard with a stethoscope?
20. What are the fibrous rings (annulus fibrosus)?
21. What is the relationship of the heart's fibrous skeleton to its conduction system? Why is this important?